Saturday, 17 December 2016

Bartolini Tube-It

Came across a schematic for this awhile ago as it seemed interesting. It's supposed to be a fairly rare overdrive pedal fetching up to $500. Here's some information I found about it:

The rare 1980s Bartolini tube-it Distortion Overdrive pedal made in Livermore, California, USA. Makes any amp sound like a Marshall. This may be the only pedal Bartolini ever made. Three position switch for more or less overdrive -- plus treble, bass, sustain and output controls.

It was designed to emulate the distortion characteristics of an early 80s Marshall JCM-800. Probably made in the mid 80's. Three way boost switch unloads tons of gain from mild to overkill. The circuit is set in a giant block of epoxy so there are no clones or schematics available.
 

Does anything from smooth, cleaner OD to straight up blistering, sustaining lead tones. Has the three way boost for different tone styles. Can do TS-9, Marshall, or its own thing all together. Controls include bass, treble, sustain , and output.
 

Whip the bottom off the tube-it and inside there's a little trim pot for adjusting the sound to be bit more, or less present. All models may not have this option. The trim is a small plastic wheel (see photo in the Disqus section) similar to the color to the exterior paint job.
 

Some of the tube-its were said to be mercilessly treble boosted. The pedal can get a sound like a healthy Tube Screamer in the first position. Now up the boost one notch, to add a little more drive, and fullness.
 

Perfect for lower output pickups. Need some grind? Just flip the boost switch to position three. It's at least double the increase in gain, as between positions one and two. The circuit is now presenting significant drive, and a fuller, slightly distorted tone. Let's not forget the absence of tone suckage when it's not kicked in. A very fine, versatile pedal.

The only thing I changed was make the high low switch 2 different switches so you can control each one independently.


Monday, 12 December 2016

Tube-Town Effects

Here is a serie of tube effect pedals by the German Tube-Town which were requested a while back.
There aren't videos available but you can find all infos, schematics and pcbs on their website here.
(The Pepper Shredder has been discontinued but it's supposed to be a tube distortion based on the Twin Valvecaster)


Saturday, 10 December 2016

Fuzz Central Liquid Drive

Came across this the other day and since I'm in the mist of finals I figured it would be a nice way to get my head away from my work and relax. Basically this is just a modified Ross Distortion, but has enough differences that I feel warrant a layout of its own, plus not sure how may people have seen it before.

List of differences from the source:

  • Time for a Better IC: After "auditioning" the single OPAMPs, I've decided to use a good 4558 in the Liquid Drive for better all-around sonic performance, in this case a Burr Brown OPA2134PA. You can also try all the other 4558-types, like the JRC 4558D and 4558DD, Burr Brown OPA2604, Texas Instruments RC4558P and several others.
  • Stabilizing the IC: Since this circuit utilizes a dual IC, but actually uses only one of the two internal amplifiers, we need to stabilize the second unused amplifier. In order to do this we'll tie pin 5 (non-inverting input 2) to ground, and attach pin 6 (inverting input 2) to pin 7 (output 2).
  • More Treble Response: For more treble response in the circuit, specially tailored for my modified Fender Telecaster and Twin Amp, I changed the 10nF input capacitor to a smaller value, in this case a 3.3nF.
  • Asymmetric Clipping Diodes: I personally prefer the sound of asymmetric clipping. For the Liquid Drive I chose to use 1N270 Germanium diodes for their warmer, more throaty response compared to Silicon diodes or LEDs. They're also a little more squishy and compressed sounding than Silicon diodes or LEDs, which makes them sound more like tube distortion to my ears. Using asymmetric clipping also enhances the harmonics and boosts the output of the circuit. The only drawback is that the drive range is decreased a little, but we'll make up for that in the next mod!
  • More Gain: In order to recover the gain range lost by using asymmetric clipping, I've lowered the 4K7 resistor on the 3rd lug of the "Drive" pot to 3K9...not a drastic change, but it does increase the available drive range.
  • More Low-End Response: To get a little more low-end response out of the circuit, I increased the value of the 47nF capacitor that's attached to pin 2 of the IC to 68nF.
  • Increased Output Level: In order to get a little more output from the circuit, I've used a 100K linear taper pot for the "Level" control. The linear taper pot will allow more output sooner in the rotation of the pot, as opposed to a standard audio taper, where all the useable output is in the 2 o'clock to 3 o'clock range. The linear taper takes some getting used to, but I think it's better to have that extra output sooner in the rotation range. The linear taper pot is LOUD at 11 o'clock.
  • Use Non-Polar Film Capacitors Instead of Tantalum: In order to get more clarity from the circuit, I've replaced the two 1uF Tantalum capacitors with 1uF non-polar AVX boxed metal film. They're larger than the tants, but I think their better sound quality is worth making a little more room on the circuit board for them.
  • Power Supply Filtering and Polarity Protection Mods: To add some extra nose rejection and polarity protection to the circuit, I've added a 100-ohm resistor in series with the power supply before the power makes it to the circuit, and then I added a 100uF Electrolytic and 100nF Cermaic capacitor in parallel with the power supply after the series resistor. These two added capacitors provide superior noise/hum rejection for the circuit. I've also added a 1N4002 diode in parallel with the power supply after the series resistor to help prevent damage to the circuit in case the battery or power supply is connected in reverse polarity. To some these extra parts may seem like overkill, but to me they're piece of mind :)
In the end you can try different diodes and Dual Opamps and see what you like best. I know I'm not the only one that's a big fan of the DOD250/MXR Dist+/Ross Distortion for it's great tone, simplicity, and the ease at which it can be tweak to your liking.


BYOC Confidence Booster

The BYOC Confidence Booster is just a simple linear boost and buffer. The only change i made was moving the trimmer offboard to make a pot. Figured this would be a nice easy project for those that want to get started building pedals.


Tuesday, 6 December 2016

Carl Martin Crush Zone

Here is a simple distortion pedal by Carl Martin.
Original FSB thread and schematic available here.


Thursday, 1 December 2016

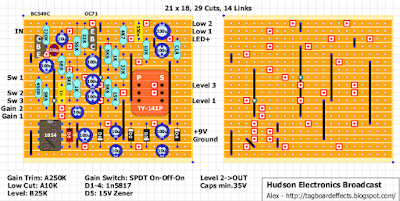
Hudson Electronics Broadcast

Original info:
The Broadcast is a transformer coupled, discrete Class-A germanium pre-amplifier based on the classic broadcast consoles of the 1960s. In the low-gain setting, the Broadcast can cover everything from sparkling clean boost through to transparent overdrive, all with a healthy dose of volume available to push your amp. The Broadcast features a specially selected Triad steel-core transformer and a NOS germanium transistor. Advancing the gain on the Broadcast starts to saturate the transformer and the pedal’s discrete circuitry, giving rise to a gentle and dynamic compression coupled with subtle thickening of the midrange. With the gain switch in the high setting and the trim control wound up, the Broadcast starts to deliver heavier distorted sounds with a warm and fuzzy edge to them. The Broadcast covers a wide range of driven and distorted tones whilst remaining dynamic, responding well to pick attack and the subtle nuances of every player.

Thanks to Tipunk777 for reverse-engineering his own pedal in the Forum section.
There are 2 layouts:
one with a 24V charge pump and one without.
23/12/2016 Layout updated! Changed Gain Switch to On-Off-On and rotated OC71 180 degrees
Added a second layout with charge pump. It's the same as before but on the top of the layout to give more space to the transformer.


Tuesday, 29 November 2016

Earthquaker Devices Tentacle

Basically the Tentacle is Dan Armstrong Green Ringer with a few value changes.

Now for those of you that liked the idea of building a Hoof Reaper, which I mentioned when I posted the layout for the Tone Reaper, the Tentacle should go in between the Hoof and Tone Reaper for the Octave effect. So for all the disciples of fuzz out there, pair this your favorite fuzz for some crazy octave up fuzzy goodness.

Direct from the source:

The Tentacle is a classic analog octave up effect. It is the very same octave from our beloved Hoof Reaper pedal. We got so many requests to make this a stand-alone unit that we just had to make it a reality. You can now add an excellent, swelling octave up to anything your heart desires! Pair it with your favorite fuzz, strap on a headband and unleash your inner Jammy Hendrix. Put it in front of another octave up and blow your amp's mind. Throw it in the effects loop of a delay and marvel at what happens (then tell us, we’d like to know too). What’s better? It has no controls! Nothing to worry about at all here, just hit the switch and go for it. The Tentacle is an analog octave up, the effect will become much more pronounced when using your neck pickup and playing above the 12th fret.


Edit: For those that have built this already based on the original layout upload, flip Q2 so the Emitter is towards +9V and the Collector is towards Ground.

Sunday, 27 November 2016

Charge Pump Extravaganza

Here's something I've been looking for for awhile now for a project I've got in the works, and figured some of you guys may be looking for the same thing. They're based off of the schematic published by the one and only R.G. Keen, found here.

Layout 1: +9V to +17V


Layout 2: +9V to +25V


Layout 3: +9V to +33V


Remember to watch your electrolytics voltage rating, especially with the +33V charge pump
Note: You can NOT substitute the MAX1044 for 7660s or NE555 IC.

Earthquaker Devices The Depths

Direct from the source:

Ahoy! Welcome to your new Depths Optical Vibe Machine! The Depths is our take on the classic optical vibe circuit. Now you can swab the decks with the same lush, pulsating, three-dimensional swirling sound you know and love, with some modern accouterments for all you land-lubbers out there.

The Depths is optimized for use with all kinds of instruments, pickups, and to play well with dirt, so nobody’s left waiting on shore. If it’s got a ¼” output, plug it in and get deep!

 In addition to the classic vibe controls, the Depths features unique controls for “Voice” and “Throb.” The “Voice” control adjusts the midrange focus of the Depths, which is perfect for tailoring the effect to your particular instrument. Clockwise, you’ll hear a fuller sound with a low-end focus. Counter-clockwise, you’ll hear a thinner, spikier sound with a forward upper-midrange bite.  The “Throb” knob adds a hefty subharmonic low-end pulse to the vibrato signal, which is especially useful on synthesizers and the bass guitar. It sounds great with a little bit of dirt on the neck pickup of a guitar, too! This works best with the “Voice” turned counter-clockwise for a warmer tone.

The Depths’ “Intensity” and “Rate” controls are dialed in to give you the classic optical vibe sound at more modest settings, but dive in deeper and you’ll find anything from a smooth ultra-slow warble to sharp, speedy bursts! Also, the “Level” control has tons of output above unity on tap to combat the perceived volume loss of most vibe pedals, so your tone is always above water. And, if 9v isn’t enough to keep you afloat, the Depths may be powered at 18v for a stiffer tone with more headroom and sparkle.


We've got 2 layouts for you.

Layout 1: We've got the the LFO off the main board to hopefully prevent the dreaded LFO tick. Should fit in a 125b like the original. Downside is that there is more offboard wiring you will need to do.

Layout 2: Slightly larger board, with the LFO on the main board. You shouldn't get any ticking, and you'll save on having to deal with the extra offboard wiring.

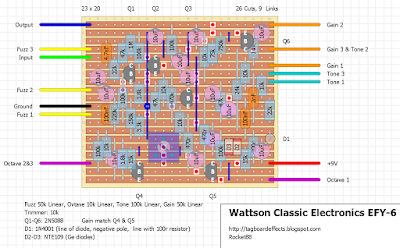
Wattson Classic Electrons EFY-6


Found this on TGP from the man himself when he was first releasing it:

Basically, it's an FY-6 with some extra bells and whistles in a "pedal board friendly" enclosure. The official name is the EFY-6, with "E" meaning "Enhanced".
The "Expander" knob has been renamed "Fuzz", and the "Balance" knob has been renamed "Gain", as these more clearly describe what these controls do.

We fiddled with the differential amp and worked out a way to be able to adjust the amplitude of half of the cycles coming out of it. Turn it all the way down and voila! No octave step up! Turn it all the way up and it sounds like an original FY-6. In between you can adjust for however much chord smashing synthy overtones you want. This knob is appropriately called "Octave".

A cross-fade knob was installed between the mid-scoop filter and the voltage divider that used to be connected to a switch labeled "Tone". You can now blend between the two tone settings. Obviously, this knob is called "Tone".

The final stage got a gain boost so that the maximum output signal level is more than 4X the maximum output level of the original FY-6, or more than double the volume.

With the knobs set appropriately, it will sound just like an FY-6. Move the "Octave" or "Tone" knobs away from their limits and you can get tones not possible with the original FY-6.


Unfortunately, Wattson Classic Electronics has shutdown, and while they were around they made very few of these. What brought me to find out about this pedal is that the guys of SUNN O)))) have been known to use this pedal.


Set the trimmer to get the octave effect.

Friday, 18 November 2016

Schumann Lion

Here is a layout for the rare Schumann Lion distortion.
Original brief description:
"The LION is a distortion device and a clean booster with two complete circuits that can be mixed independently.
Has a bypass footswitch and boost footswitch that gives extra distortion.
Great for bass -- distortion that doesn't cut out the low end.
Great for guitar -- minor chords retain clean harmonics -- you can get great distortion but still hear definition of notes."
You can find original DIY thread and schematic here.
30/11/2017 Layouts Updated! Changed Drive pot to B1M and added 470uF capacitor.


If you want to use Mark's Bipolar Voltage Converter:

Thursday, 17 November 2016

Smallsound/Bigsound Team Awesome Fuzz Machine

Original description:
"The TAFM was designed for low end heaviness with the ability to cut through a mix, to simply keep your guitar’s pick attack while having a really saturated fuzz-tone or just to have a subtle background fuzz behind your main keyboard sound. the TAFM excels at versatility and fitting in with almost any instrument in almost any musical setting.
the thick, gnarly fuzz is perfectly complimented by a slightly gritty clean blend which retains all the low end you’d need… plus more. rough overdrive, howling feedback, clean boost with fuzzy sparkles, even phase-cancelled signals for pseudo octave-up/weird discordance and everything in between."
Original FSB thread and schematic available here.


Wednesday, 16 November 2016

Fuzzhugger Doom Bloom

From the source:

The Doom Bloom reimagines Algal Bloom with new controls, more lows, bite, mass, and more available
headroom. It's stupid with lows and menace! Designed to hold together and retain clarity with lower tunings.


Controls: 

- Bloom is Bloom...it's fuzz+gain+definition. It increases gain and note separation. Rather than going mushy or
washy, it holds together pretty nicely when cranked. It holds up well with lower tuning because of this.


-
Head is headroom. As you turn it right, headroom increases, making the pedal less clipped, but also louder and
more open (favoring transistor fuzz over clipping diodes). So while turning right reduces how clipped it is, it also
increases mass, for some big thunderous chords. Full-spectrum massive attack!


-
Body (Body and High work together). Body shifts a huge amount of lows in/out of your sound...but leaves your
highs totally in tact. (Unlike Tone controls that make you choose either [bassy and dark] OR [bright and thin]). Body
also adjusts fuzziness.


-
High lets you then control your highs, separate from Body. Set your lows and fuzziness where you want it, then
adjust your highs.


-
Bias biases the first transistor gain stage (controlled by the Bloom knob), functioning as an additional boost and
character control with massive boosting power!


Sunday, 13 November 2016

Frostwave Funk-a-Duck

"The Funk-A-Duck is an envelope control filter which can be used to produce a wide range of "synthetic" analog-ish sounds. The input causes a control signal to be generated, which goes up and down as the input signal loudness contour goes up and down. This in turn sweeps the filter frequency back and forth."


  • Output Level
    Sets the output level ;)
  • Envelope (Down-None-Up)
    Controls the amount & polarity of envelope modulation.
  • Input Range
    Sets the input sensitivity, has major effect on intensity of effect as well as overall loudness. Important to set this so that when bypassing, the levels are about the same.
  • Res
    Sets resonance of the filter. Can be turned up to actually resonate, either continually or when triggered by peaks of the input signal. This is one thing that makes the unit rather unique.
  • Frequency
    Sets the filter cutoff frequency. It has a very wide range, so it is possible to have it set so NOTHING at all comes through. Also, when any of the other knobs (input, res, envelope, speed) are adjusted, the resonance freq moves, and needs retweaking.
  • Speed
    Sets attack/decay of the envelope. When fully anticlockwise, the speed is FASTEST. Recommend using in this position, at least until one is familiar with the unit.
  • LP Filter / HP Filter
    Selects the type of filter: lowpass or highpass. Unit will resonate in either mode.

  • Original FSB thread and schematic are available here.
    I've used an LM13700 instead of 2 LM3080.
    Drawing it was quite complicated and it came out quite large.
    Always double check the schematic before building an unverified layout.
    (You may be able to use an LT1054 based voltage doubler but I'm not sure about noise level)
    Special thanks go to Digi2t (Dino T.) for drawing this and many other schematics we've been using on this blog.
    Here's his video:


    Friday, 11 November 2016

    Bogner La Grange

    Original Info:
    The La Grange pedal is designed to emulate the famous British "Plexi" amplifiers from the mid 60's. The wide variety of controls and switches, give you decades of legendary plexi tones, all the way up to the era of the modded amps from the late 80's and throughout the 90's.
    An independent boost function, with a level control, can be activated via it's own foot-switch to be either used as a stand alone boost, or together with the La Grange's main circuitry. Essentially two independent pedals, with the boost being in series after the La Grange!
    Reinhold designed the La Grange pedal with an op-amp input, followed by five discrete Class A gain stages and incorporated Germanium diode clipping. This approach minimizes the input noise floor while retaining touch sensitivity and clarity throughout the entire gain range.
    Original FSB thread and schematic available here.
    You can find the original manual PDF here.
    I've used Mark's Dual Effect Offboard wiring.
    21/11/2017 Layout Updated! Fixed Boost section based on updated schematic.


    Friday, 28 October 2016

    Hughes & Kettner Red Box Classic DI

    Original info:
    The Hughes & Kettner Red Box Classic converts Line, Out and Speaker Out signals into balanced, frequen- cy-compensated signals, enabling a direct feed to a mixer. The Red Box Classic features two voicing options, a 4x12" cabinet and a 2x12" combo.
    You can find the original manual PDF here (must read!)
    Original schematic is available here.
    You can use an adapter or the 48V Phantom power via Balanced Output jack.


    ...and without Ground Lift switch

    Paia 5730 Gator

    Here is a great sounding Attack Delay / Noise Gate / Swell pedal.
    I've used a more common LM13700 instead of LM3080.
    You can find original project and scheamtic here.
    I could not find any videos for this effect but there are some sound samples available here.
    The original effect uses a momentary SPST footswitch.
    I've also added an unverified true bypass version.
    If you don't want the External Trigger just remove it and connect Thresh 1 to LM308 pin 2.


    Wednesday, 19 October 2016

    Earthquaker Devices Tone Reaper

    From the source:

    The Tone Reaper is a vintage style fuzz device based on the “3 knob” bender. It’s a silicon/germanium hybrid capable of producing an array of tones from every bender era with careful tweaking of the tone and fuzz controls. From thin and spitty to a growling crunch, all with a midrange punch to make it scratch and kick through any mix. The Tone Reaper will also please anyone looking for the higher gain Randy Rhodes style grind at it’s higher fuzz settings. All analog, true bypass and made one at a time by real humans in stuffy Akron,


    Basically it's a modified Tonebender MKIII, with the biggest change being the Germanium darlington pair normally in Q1 & Q2 being replaced with a high gain Sillicon transistor.


    Thanks goes to Galapagos, who traced his Tone Reaper, schematic and trace here. You'll notice there's a diode he marked mystery, which from what I can tell looks like a 1N4848/1N914, so that may take some experimenting. Also, without knowing the hfe and leakage of the AC176, I can't say for sure what would be a good substitute, but you may want to try the typical NPN Germaniums  typically use like MP38A, but these typically have little to know leakage while the original tonebender Q3 likes a lot of leakage.


    Side comment. For those that want to have some more fun, you can build the Tone Reaper and put it in front of a Hoof, each on their own switch and make 2/3 of the Hoof Reaper, as we don't have a schematic for the switchable octave in between.

    EDIT: for all those that want to make a Hoof Reaper we have a layout for the octave section, as it's the Tentacle. Build on Brothers of Fuzz.

    Monday, 10 October 2016

    Menatone None More Black

    Here is a very nice sounding distortion by Menatone.
    I've drawn 2 layouts:
    - with biasing resistors
    - with biasing trimmers
    I've also added a charge pump for the 18V required.
    You can find the schematic on FSB's original thread here.

    Original info:
    The Menatone None More Black is a homage to all of their favorite high gain amplifiers. Amps with very German sounding names and amps named after Big Rig fuel. While not based on any specific amp, it is an amalgam of the best aspects of many amps rolled up into one. The gain of the None More Black ranges from hot rodded 800, to crazy, in your face, all out insanity. The SUCK knob can take the mid range from all the way gone, to crazy gobs of fat, vocal, goodness, while the PRES gives total control of the high end. This deceptively simple arrangement gives a surprisingly complete control of the tonal palette. 


    Feisty Little One Thermal Detonator

    This is a simple silicon Fuzz Face clone with added features.
    You can find all the info on their site here.
    The original thread with schematic is available on the FSB forum here.


    Madbean Stank

    Here is Brian's version of Aron Nelson Smash Drive with added TMB tone stack and recovery JFet buffer.
    There are no videos available but you can find info and schematic on Madbean's website here.

    Tuesday, 4 October 2016

    Handmades Hell's Gain / HG-1

    This was a request.
    It's a diy Marshall emulator designed on Handmades Brasil forum.
    You can find the original schematic here.


    Tuesday, 27 September 2016

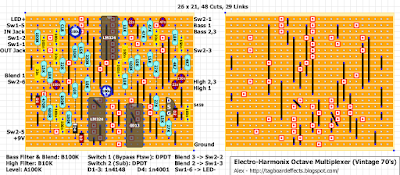
    Electro Harmonix Octave Multiplexer

    Here is a layout for a classic pedal.
    I've drawn 2 versions: Vintage and Modern.
    There are 2 layouts for the Vintage: with and without output boost.
    I've added a boost to the Modern layout to avoid volume loss.
    You can find the original FSB thread here.
    16/01/2017 Layout updated! I've changed the vintage layouts because there were some errors in the schematic.
    Thanks to Barcley for pointing out the corrections that I needed to make!


    Electro Harmonix Black Finger Compressor/Sustainer

    Here is a layout for the older version of EH Black Finger.
    You can find the original FSB thread here.
    I've used Pedalgrinder slightly modified schematic on page 3.
    Some suggested high gain, some low gain transistors.
    Should test them both.


    ... and the LM13700's version:

    Electro Harmonix Full Double Tracking

    Here is a verified layout for a quite unknown slapback-echo EH pedal.
    You can find the original FSB thread here.
    I've added an output boost to cover volume loss.
    I've found only one video around but didn't sound great.


    Saturday, 24 September 2016

    Paul Trombetta Designs Bone Machine

    Here is a great fuzz pedal similar to the Rockett WTF (which Paul also designed).
    A couple of capacitors are unknown.
    You need to test different values (shouldn't be too difficult to find the correct ones).
    Schematic and original FSB thread are available here.
    Paul has also added a Si/Ge transistors switch to his V.2
    I've added a second layout with the new extra switch but it's all guesswork.


    Visual Sound Jekyll & Hyde

    This is a verified layout of the Grey Version with an added Bass Boost switch borrowed from V.2
    It's basically 2 modified well known circuits in series (TubeScreamer & Shredmaster).
    There are 2 versions:
    - a true bypass version were you wire two separate 3PDT footswitches in series.
    - the original Visual Sound version which uses a Multiplexer Switching daughterboard.
    The result should be a much smaller pedal compared to the original.
    You can check Strassercaster verified version on the forum section.
    Schematic and original thread from FSB are available here.


    Thursday, 22 September 2016

    Madbean Tapanator Projects

    Here are some great new Tap-Tempo projects by Madbean.
    I prefer to add them all in the same post because they are meant to work together.
    You could use 1/8" jack & plugs.
    You can find all info and his great (and cheap!) PCBs on his website here.
    The TapLFO is available from SmallBear here.