Monday 30 June 2014

Boss CE-2

Seeing as I'm on a roll with these at the moment I thought I'd add another popular chorus pedal.  It's based on a few bits from 3 different schematics, and includes a Vibe and Intensity mods from the Tonepad scheme, rate LED and depth increase from Madbean's Pork Barrel and the schematic from Electrosmash which has a great in depth analysis of the CE-2 which is well worth a read, although I did decide to use common 2N5088 transistors as used in the Pork Barrel instead of the less common 2SC used in the original.

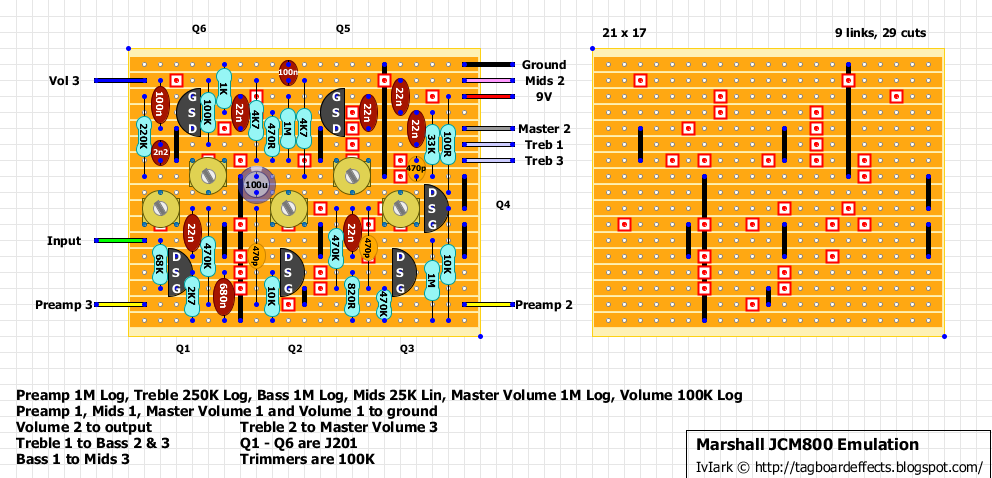
For the intensity switch I've opted for a 100p cap to go in parallel with the 47p between IC4 pins 5 & 7, but I'd recommend socketing the 100p and trying a few different values to see which works best for you giving the best range of tones.

One for a 125B I reckon.

Info about the fine original:
The CE-2 effect unit is a new. compact version of the famous BOSS CE-l chorus ensemble, which has become one of the world's most popular units of its type on the  market.  Two separate controls are provided for independent variation of RATE and DEPTH to expand the creation possibilities. This advanced unit also has a fine S/N [S/N 90dB or more (IHF-A)] for lower noise operation. An LED lights to tell you at a glance when effect is on.


As an added bonus, here's an add-on stereo daughterboard option.  Note that a stereo option isn't available for the CE-2 and so this has been inferred from the implementation in the CE-3.  It should be good to go but should still be considered experimental until someone verifies, and so at this stage it's one for the tweakers.

All other connections to the CE-2 board have been removed to simplify the layout, and you'll see that the B connection will require the covering link to be pushed to one side slightly to allow the wire access to the hole.  If you are including the Vibe switch option then a DPST will now be needed (or DPDT if they are easier to source), with the A wire also being switched.


And on Miro's recommendation this version removes the Madbean depth mod which took something away from the authentic CE2 sound to him.  I've called it "Original", but have left the Vibe and Intensity switches in there as an option simply because you will still be able to set it in 100% original mode if you choose to using the switches (or omit them entirely of course if you prefer).


Addition - 5th January 2019
New version with Anti-Tick mod which will apparently cure all problems with noise.  Thanks to Razvan S for the heads up.


Saturday 28 June 2014

EHX Small Clone

Modded to include a depth pot instead of the switch used in the original, giving you variable depth control rather than just two preset levels.  Not the best looking layout with too many links and cuts, but it's a means to an end, and it's hard to avoid when you have 4 ICs, 3 transistors and lots of interconnections, so I'm just happy that I managed to keep the size down.  21 x 28 will be a squeeze to get in a 1590B, but with only two pots and no other switches it shouldn't be a problem for most people.

I didn't have enough room to fit in pulldown resistors on the input and output and can't bring myself to add extra columns just to do that, so if you get any popping just add them to the stomp switch, 1M between input board wire lug and ground lug, and 100K between output board wire lug and ground lug. I may actually do it with surface mount resistors on the copper side of the board (the entire second row is ground).

Anyway, you all know what it is so no need to describe further.  Manufacturers info about the great sounding, and very well priced original.

The classic chorus! Analog chorus pedal popularized by Kurt Cobain. The finest analog chorus sounds: from clear, rich and dimensional to warm pulsating warbles, can be intensified with the Depth Control. Simple tweaks generate exciting doubling effects. Chiming 12-string tone, or Leslie-like warbles.


Friday 27 June 2014

Toneczar Openhaus

[Updated 1st August 2014 - The schematic I did this from by UngodFX contained an error around the mids pot and mid voicing switch which stopped the switch from working correctly.  The layout now posted corrects that error.  For anyone who has already built this and needs any assistance in adapting it, post a message in the comments and I'll explain what you need to do.  Thanks to Javi for helping fault find his build and confirm the correction]

Ok loads of people have asked for this and I decided if there was ever going to be a good time to do it, it would be straight after the Mutron II :o)

The 150LNDN3's are available from a few sellers on eBay but they are very expensive.  I think Mouser had plenty in when I was buying though and they were cheap from there, so that's where I'd look.  The 2N1306's are available from a few sellers on eBay but just use any NPN germanium if you don't want to buy anything specially.

The wiring for the expression pedal will depend on which one you're using, but if you know how it is set up it should be easy enough to adapt it in any way you need to your pedal.  Note that if you don't want to include the expression pedal jack, you need to connect Exp 1 and Exp 2 on the board, so just wire one to the other.

A charge pump daughterboard layout has been included with additional filtering to help keep this as noise free as possible.  Note that I have opted here for an LT1054 IC because I think it will be borderline for the current available from our usual ICL7660S.  By all means try that IC, but I think the extra capacity of the LT1054 will make it a good choice.

Info about the original:

the openhaus can create an array of modern, heavy distortion tones from popular amplifiers, without adjusting the amplifiers tone controls away from their optimum clean tone settings.

Short but sweet.  You'd have thought Ed would give his customers a bit more to read during their 5 year wait for the pedal.


Charge pump daughterboard:


Bill of Materials

IC OPA2604AP
4
Transistor LND150N3
2
Transistor 2N1306
2
Transistor 2N5457
1
Regulator 78L15
1
Potentiometer 10K Log
2
Potentiometer 100k dual Lin
1
Potentiometer  1M Log  
1
Potentiometer 10K Lin
1
Toggle switch   SPDT on/off/on
2
Toggle switch  SPDT on/on
1
Resistors 100R
1
Resistors 150R
2
Resistors 220R
1
Resistors 470R
2
Resistors 604R
1
Resistors 1K
3
Resistors 2K2
1
Resistors 3K3
2
Resistors 5K6
1
Resistors 7K5
2
Resistors 10K
6
Resistors 14K
1
Resistors 20K
3
Resistors 30K
2
Resistors 47K
2
Resistors 56K
3
Resistors 100K
4
Resistors 120K
1
Resistors 150K
1
Resistors 180K
1
Resistors 220K
1
Resistors 470K
2
Resistors 680K
2
Resistors 1M
7
Capacitors 51p
1
Capacitors 330p
2
Capacitors 560p
1
Capacitors 1n
1
Capacitors 1n2
4
Capacitors 2n2
1
Capacitors 4n7
1
Capacitors 5n6
1
Capacitors 22n
1
Capacitors 33n
2
Capacitors 47n
4
Capacitors 100n
2
Capacitors 120n
1
Capacitors 1u
7
Capacitors 22u
1
Capacitors 100u
1
Capacitors 220u 25V
1
Capacitors 470u 25V
1

Wednesday 25 June 2014

Mutron Phasor II

John did a great version of this using vactrols but I wanted a version using simple LDRs so it was available to build for the maximum number of people. 

I would have preferred to have done this with a single LED with all 6 LDRs surrounding it, but it's too awkward to do neatly with vero, so instead opted for 3 LEDs, all with an LDR on each side.  These Tayda LDR's will apparently work extremely well with this circuit and diffuse yellow LEDs and so that is the recommendation, but it is always worth socketing and trying whatever you have to see what will work for you.

Because this is a phaser and as usual certain matched components will give the best results, I would recommend trying to get a good match with the LDRs for light and dark resistance.  This may not be necessary but it can't do any harm.

As usual with these you need to test them in the dark or isolate the LED/LDR combo from the light in some way when testing, it obviously shouldn't be an issue when boxed but I'd still be tempted to make little cardboard box surrounds for each LED group.

The LED+ connection is for the indication LED which will pulse at the rate of the phasing.

Now this sounds bloody great to me


Bill of Materials

Opamp JRC4558 6
Transistor 2N4401 1
Resistors 120R 1
Resistors 330R 1
Resistors 560R 2
Resistors 1K 1
Resistors 2K2 2
Resistors 3K9 2
Resistors 4K7 15
Resistors 8K2 3
Resistors 10K 3
Resistors 18K 1
Resistors 39K 1
Resistors 47K 2
Resistors 68K 3
Resistors 220K 7
Resistors 390K 2
Capacitors 47p 1
Capacitors 820p 1
Capacitors 1n 1
Capacitors 3n3 1
Capacitors 6n8 6
Capacitors 100n 2
Capacitors 470n 2
Capacitors 1u 1
Capacitors 10u 2
Capacitors 47u 1
Capacitors 220u 1
Diodes 1N4148 3
LEDs 5mm Yellow diffuse 3
LDR 10K/500K 6
Potentiometer 10K Lin 1
Potentiometer 10K Log 1
Potentiometer 25K Log 1
Trimmer 1K 1
Trimmer 10K 1

Saturday 21 June 2014

Durham Crazy Horse

I noticed we didn't have this one in the library yet. The circuit is rather interesting mash of different bits and pieces. TS-styled clipping amp with serious sag called "Volts", followed by two fuzz face style (with some features from the bazzfuss) circuits in series, which is followed by Big Muff-styled tone control. Not your standard Overdrive/Distortion/Fuzz, but i do find this interesting.


Briggs' P.A.F. Overdrive

Read all about it.

Arsenio Novo Tubesound Overdrive

Old DIY classic with its roots pointing to rec.music.makers.guitar newsgroup and the year 1995. Briggs has posted the newsgroup message on his blog.
So here it is. Quick and mean. Should be easy enough to be built in fifteen minutes. Just match those transistors.
I know what the first comment will be. So don't bother to ask. I'm posting the Briggs' version right after this one. I thought we need to have both up in our library...


Jen Harmon Booster

Not sure what to call this. It has "Booster" written on the original unit, but still i think it's rather closer to an overdrive than a booster. It's definitely not a fuzz. Either way, it does sound pretty nice in the demos. There are other layouts for this circuit around the internets, but i thought i'd be cool to have one that's 1590B friendly. As usual, i've added polarity protection and a filter cap (220µ), to make yours per original, just omit those accordingly. Transistors were BC318C in the original, but i think our closest modern day analogy would be BC549C. Before anyone asks, Input goes to Gain pot's lug number 3.


Janglebox

A few people have asked for this.  It's pretty obvious what it's based on but I definitely think it's worth a build even if you already have a Dyna Comp or Keeley (etc) type compressor.  The tone switch does give you a lot of variation and I must say I was impressed by the demo vid.

Info about the original:

The original JangleBox compressor/sustainer is the pedal that captured the clean, bright ringing chime popularized by the Beatles, enhanced by the Byrds, and integrated into the sonic palettes of so many contemporary groups.

Ten years and thousands of satisfied customers later, there was no reason to reinvent the wheel, but we did add some subtle tweaks that make this unique pedal even better: a more stable IC chip, a more standardized power polarity and an enclosure that sits a bit closer to your pedal board.


Best of all, we brought the JangleBox home. Handmade in the USA once again, this simple plug-in/play compression pedal creates a bold sustain that will give your Ric, Tele, Gretsch, Strat — whatever the guitar — remarkable presence. Unlike pedals that clip or distort the original signal, the JangleBox expands the compression “sweet spot” to maintain a clean, even tone, with true bypass.

Compact and powerful, the JangleBox is ruggedly constructed for demanding pros and aspiring artists alike. Whether you’re looking to get that Beatles/Byrds chime and jangle, never-ending slide sustain, Nashville “squish,” or just a big, clean boost, the JangleBox delivers the distinctive compression edge.


Friday 20 June 2014

Oddfellow Effects Caveman Drive

This looks kind of familiar.  Let me think about it .....  Oddfellow Effects Caveman Drive ...
No just can't remember, it will come to me.

OK I nicked that joke from Dr Boogey on FSB, and thanks to him for the trace.
One thing I must say is that in this vid it sounds a lot better than the OCD V4 that I used to own.

Info about the original:

The Caveman Drive is an extremely transparent overdrive that has an amazingly versatile range of sounds! This pedal nails every sound from full distorted tones to softer overdrive.The one thing about the caveman that amazes players is the dynamics. They are simply amazing. Not only is the caveman drive one of the best sounding drives on the market, it is the best feeling. The Caveman is one of very few pedals on the market that actually feels and reacts like a cranked tube amp. Go from screaming distortion to sweet, smooth, overdrive with no volume loss by simply lowering your guitar’s volume knob. Perfect for all styles of playing! The controls are volume, tone, drive and a brilliant fixed volume and gain boost which is just enough to give you that push for a solo.


Way Huge Pork Loin

[10th July Layout now fixed and verified, many thanks to John who bought and traced an original]

Requested by a few people.  The juvenile in me was so tempted to call this one the Huge Pork Sword, but thought I should start acting my age :o)

This is a fairly big circuit for an overdrive but should still fit in a 125B I reckon.  It seems to be very tweakable with 5 external pots and 3 internal trimmers so should give a wide range of tones.

The 2N2484 transistors aren't very common but can still be obtained from a few sellers on eBay without re-mortgaging your house, but if you don't want to buy anything in specially, just use any NPN transistors around 250 - 400 hfe.  The 2N2484's are metal can with the triangle pin arrangement allowing you to easily mount in any pin order, and you'll notice that to make the layout flow better Q4 and Q7 have an unusual CEB pin arrangement.  Keep that in mind when selecting and mounting the transistors, and twist the pins as required if using a transistor with inline pins.

Info about Jeorge's, and now Dunlop's, versatile overdrive pedal:

Make room for one more Way Huge original! The Pork Loin incorporates two distinct tonal pathways that are blended together—a modern soft clipping overdrive and a modified classic British preamp for clean. At the heart of the Pork Loin’s overdrive path is a soft clipped BiFET overdrive gain stage with a passive Tone control, rounded out by a Curve function that gives the user freedom to fine-tune corner frequencies. The Volume control regulates the masses of pork power that exude from its space age circuitry, leaving room for the Clean control to blend in its warm glistening clean tones. Additionally, the Pork Loin has three internal mini controls: Filter and Voice deliver extensive tonal shaping possibilities, while the overdrive Mix control allows the Pork Loin to be run as a clean preamp. With a wide range of dynamic tones, the Pork Loin is the premier overdrive pedal on the market today!


Thursday 19 June 2014

Ibanez SD9M Sonic Distortion Mod

There are two dual opamps, and one half of the other is completely unused in the original. So i used the remaining half as a buffer for the reference voltage. D1 and D2 are your clipping diodes. Should be easy enough to add a third switch to act as a diode clipping switch.


Mutron III

A few people have requested this, and I hope they all don't mind making links :o)  LED/LDR layouts are such a pain!

A very well regarded envelope filter that many think is the best sounding one of them all with this being based on RG's Neutron project files due to the unobtainium status of some of the original parts.  I have modified this slightly from the original because I didn't like the idea of the Gain pot and first opamp stage being permanently in the signal path of your effect chain, and there's really no reason why it should be now DPDT and 3PDT stomps are available so cheaply.  So I have made this one true bypass so just use your preferred method.

Some people have used two LEDs or vactrols to make this but I have opted for a single LED with the LDRs on either side, so you can just bend them to face the LED as you see in some Univibe type effects.  To get the best out of it the LED and LDRs need to be in darkness which obviously isn't a problem when the effect is boxed, but for testing before being boxed you will want to put a cover of some sort like a small purpose made cardboard surround to keep out the unwanted light.

For LDRs Javi suggested the GL5539 which is available cheaply and in quantity on eBay and is 40-100k light, 5M dark resistance.  But I'd suggest socketing them, and probably the LED as well so you can try a few in there and stick with the combination which sounds best for you.

The trimmer was included simply to allow you to fine tune the brightness of the LED which should allow you to tweak the best setting out of it.

The effect needs a +/-9V supply and so I have shown the usual voltage inverter board.  You can add 5 rows to the main board if you prefer but I thought this would make more sense and allow people to get it in a 125B pretty comfortably with the supply board stuck on an inner wall somewhere out of the way.  You can also omit that entirely and use a +/- 9V supply if you have one, or two batteries if you prefer.

The original included a rotary switch for the Mode selection, but there are only 3 selections and so this is easily accomplished with a DPDT on/on/on toggle which again saves lots of space.  If you go with my choice here make sure the contacts change as shown in the diagram.  Some of these switches have the opposite contacts in the middle position, and so if you get one like that you can still use it but you'll need to swap the poles.  So lug 1 becomes 4, 2 becomes 5, 3 becomes 6 and vice versa.  Then it will work fine.  And don't forget the link you need between lugs 2 and 4.

I couldn't find any marketing blurb for a 1972 effect (the year I was born) so for fun here's the patent blurb instead:

A sound effects generator for modifying a sound generating signal is comprised of a voltage-controlled filter having a variable peak response frequency for transmitting at a maximum amplitude those frequency components included in the sound generating signal that correspond to the instantaneous filter peak response frequency. The peak response frequency is determinable by a control voltage applied to the voltage-controlled filter; such a control voltage being proportional to the envelope of the sound generating signal as extracted by a control voltage generator. The filter peak response frequency is thus varied in accordance with the varying envelope of the sound generating signal.

Eh?  Start again please but slower.

And I have to say it really does sound fantastic in this vid.


And as per Javi's request this is as per the original with a 4 pole 3 way rotary switch for Mode, and with a simplified bypass that leaves the first gain stage in circuit.  Just a DPDT stomp is required for bypass, or SPDT if you don't want LED indication.  I left the charge pump board separate though because I just can't face adding any more links to it! :o)


Tuesday 17 June 2014

Death by Audio Kill Kill Filter

The Kill Kill Filter is a dual filter pedal with a semi-truck of attitude! 2 identicle eq's can be switched back and forth on the fly for an endless seeming changing sounds as you play. Create a new lead sound and then another! Blast in a solo! Chunk out on a heavy riff! You call the shots! It's mean and evil and sounds absolutely amazing after a fuzz pedal creating some of the most seething intense tones ever heard!!!

You'll notice the wiring for the main stomp is slightly modified with connections for the LED switching shown in the layout.  You can use the rest of the usual offboard wiring diagram for the audio switching and so lugs 4 to 9 remain as normal.   So the main switch will bypass the effect completely and the Filter switch will select which filter is in circuit and which LED is illuminated.

Not my cup of tea but I'm sure you glitchy filter noise fuzz thing lovers will dig it,


Sunday 15 June 2014

Marshall JCM800 Emulation

And another, being a classic rock guy this one appeals to me a lot!  I can't find a lot of info about the source of the schematic, but looking at the JCM800 2204 scheme it is extremely close.  As usual, use the trimmers to set the JFET drains (other than Q4) to between 4.5 and 5V.

I'm not sure if the pedal in this video uses the same schematic verbatim, but it should be very close if based on the JCM800 amp scheme and so should give a good idea of what to expect.


Saturday 14 June 2014

Modern SLO 100

Emulation of the Soldano SLO 100 by GT Labs and including the suggested mods by Brymus.  I've never really even used a presence control as they do nothing for me, and so I'd probably omit it altogether in this and the other recent amp emulations to reduce the number of pots, but I've left it in for those who want to include it.

I also included trimmers for Q1 to Q4 to allow you to bias each individually to around 4.5-5V.  I just selected a trimmer that easily covered the drain resistor shown and so allow you to tweak significantly above and below the suggested resistor value.  And again I included an axial cap because there was room for one that I have in stock, but a radial will do the job perfectly well if you don't have the axial.

I couldn't find any videos on this but a demo can be heard here.


And a layout based on the original scheme by GT Labs which John K thinks has a preferable drive control, and also including the original passive values with just a couple of tweaks:


and for those who would also prefer fixed resistors rather than trimmers this version uses the original drain resistor values, but I would suggest socketing as shown so you can fine tune the bias.


Wednesday 11 June 2014

Way Huge Swollen Pickle

Thanks to Kit Rae for the schematic.  I've seen a few schematics for this and the Kit Rae one has an extra connection between Filter 3 and the base of Q4 (pin 13).  Maybe you want to try making that connection and see what you think.

Info about the original thanks to the Wayback Machine :o)

Stand back! This pedal has more fuzz than a moldy peach. The Swollen Pickle is a 70's style fuzz that goes from mild crunch to Armageddon! "For truly vulgar, lard-assed fuzz, it's tough to top the Swollen Pickle Jumbo Fuzz. Buzz boxes just don't get much more corpulent than this. It's tone control elicits an insane range of heavily band-pass-filtered tones, all distinguished by remarkable girth and sizzle" Guitar Player Magazine (Sept. '96). Units have loudness, sustain and filter controls.

Video for the reissue but it'll be close enough


For those of you who do want to cheat as Javi mentioned below :o), you can do it like this


Or you could build it exactly as per the IC version, put a socket in for the IC and push the transistors into the IC socket.  Then you can wait until you find the ICs at a good price, or just until they arrive, and swap over when they do.

Tuesday 10 June 2014

Leegazzy - Carvin Legacy Emulator

Request, layout for the Leegazzy Carvin Legacy emulator by Antonio Pelaez.

I've shown a big axial cap as a filter in this one because there was plenty of space at the top and I have them exactly the size shown, but as always it will work just as well with a radial electrolytic, and you can just solder it between rows 8 and 9 (9V and ground) rather than spanning half the board.


Monday 9 June 2014

Tiny Giant Amp

Requested by a few people on the forum, this is a mini amp circuit by Taylor Livingston with a bit more ooomph than the others on here, giving 20 watts into a 4 ohm speaker, or 12 watts into an 8 ohm.

Designed to run off a laptop power supply which I'm sure we all have hanging around the house from old broken laptops, with a LM338T taking that down to a regulated 11.6V to supply the opamp and amplifier.  The pins of the TDA7240A will need offsetting slightly so it is suitable for vero, but it can be done easily enough, as checked by Lazy Swamis on the forum.

Details of the project can be found here, and there is plenty of discussion to read through if you want to at diystompboxes.

Short clip of the amp in use


Saturday 7 June 2014

Soft Latch Relay Bypass Daughterboard

[12th June 2014 - perf version added]

I've wanted to do a layout for this one for a while, but it fell by the wayside as the board will just be too big to fit in a 1590B which I use the majority of the time.  But there are a few builds I want to do now using 125B or 1590BB boxes and so this may now come in handy for me.

The idea is that you can use a SPST momentary stomp which are much nicer to use than the 3PDT stomps with no clunking, one stomp will energise the relay coil, the next stomp will de-energise it and it cycles like that.

With a footprint around 40mm x 30mm this may just about fit at the bottom of a 125B and my intention is to velcro it to that lower side so it's in the right vicinity but leaving plenty of room for the stomp.

I've got some 9V and some 12V relays, both of which should work fine with a 9V supply, but check the pull-in voltage of the ones you want to use.   These look like they'll be fine:

http://www.rapidonline.com/electronic-components/g5v-2-12dc-dpco-pcb-relay-2a-12vdc-60-4446

and these are the stomps I will be using:

http://www.ebay.co.uk/itm/290619513732

So it won't be the cheapest bypass method but nice to do for certain "best builds".

Thanks to Paul from paulinthelab for the circuit.


And something unusual for this site, but if you want to keep the size to a minimum then perf may be a good option.  This version also grounds the board input during bypass, and note that I have done this with 1/8W resistors in mind.


Black Forest - Uberschall Emulation

Another one of the amp emulation circuits I'm collecting at the moment, this one based on the Bogner Uberschall by JOK3RX on freestompboxes.  You could get this in a 1590B but with two stomps, a toggle and 5 pots it may even be a pain to put in a 125B, so as with the other recent amp sims I think most people will put this in a 1590BB.

Except Javi :o)

The effect is designed with a 9V supply in mind, but again I would strongly recommend trying this with a voltage doubler charge pump and seeing what you think about it at the higher voltage.

You're all going to have to get some more J201s in :o)


Friday 6 June 2014

MXR Phase 90 - 4 / 8 Stage

I was going to just add this to the bottom of the Phase 90 post, but on reflection thought it better to start a new one to keep discussion about this build in one place.

A few people have requested a layout for the Phase 100 and I thought this could be a happy medium until I start on the circuits that are currently a low priority due to my preference for PCBs when it comes to larger circuits to keep the box dimensions down.

I was happy with the size of the Phase 90 layout and so I thought it would make sense to make this modular rather than using a large single board as it will then allow you to add more daughterboards if you want to, maybe two to make a 12 stage phaser if you like, or three for 16 stages.

The standard Phase 90 layout was used as an example in this layout, but you could do exactly the same thing with the modded version with the depth pot if you prefer.  This inserts the new stages in between stages 2 and 3 of the main Phase 90 board which means that all other components of the Phase 90 can remain exactly the same, making it easy to add this to an existing build if you want to.  All you need to do is add a cut and make the switch connections shown at the top of the Phase 90 layout and the daughterboard, daisy chain the supply and ground and link the sources and gates as shown.  Voila, you have a Phase 90 with 4 or 8 stages selected by the Stage Switch.

I haven't done this from a verified schematic and so it's all just theory at this stage, so it's definitely one for the experimenters out there.  And of course the people who don't mind matching at least 8 JFETs :o)


GoosoniqueWorx Seventheaven

While in the mood for amp sims I thought I'd add this one which I think sounds excellent in the demos.

Similar sort of vein as the Diefet, but this time based on the Bogner Ecstasy.  It's a 9V circuit, but I thought it would again be worth including a charge pump with this and so have added the small daughterboard to allow you to supply it with 18V (or either 9V or 18V if you want to add an extra toggle switch).

The boost switch is intended to be a second stomp and so you just need a SPST, but can use a double pole if you want LED indication.

Here's the vids:


and a comparison vid between the Goosoniqueworx Seventheaven and the Bogner Ecstasy Red


Wednesday 4 June 2014

Diefet - Diezel VH4S Simulator

With 7 pots this was never going to be put in a 1590B anyway and so I wasn't so concerned about keeping the size down, although I bet it could fit in a 125B and would be very impressed if someone did it. :o)  I think most people will opt for a 1590BB though.

This is a project from techniguitare which has gone through a number of revisions over the years, with this version based on their 18V version of the circuit.  Use the trimmers along the middle of the board to bias each JFET drain to half the supply voltage.  The bottom right trimmer seems to alter the frequency of a high pass filter after Q3, and so will cut some low end.  This wasn't in earlier version of the schematic which instead just had a 100K to ground, but I can't speak French and so maybe someone could tell me the reason for its inclusion.


Tuesday 3 June 2014

Basic Audio Scarab Deluxe

Info about this great sounding fuzz pedal from John Lyons of Basic Audio, and thanks to him for the information he shared about the circuit.  Check out this and his other pedals here:

A straight ahead refined vintage era fuzz along the lines of the Tonebender with lots of sustain and gain.
Tone control smooths out the high end but is very usable at all settings.
All gain and tone settings remain articulate and sweet throughout their range.
Full fuzz sound with the clarity of an overdrive.

This is a "Deluxe" version of the Scarab with more control over "feel" and adjustments in bias.
This version adds in a couple knobs over the 3 knob version.

BIAS:
Tonebender type circuits vary depending on the bias of the 3rd transistor. Gritty gated tones on one end of the dial, sustaining lead tones in the middle and sweet lower gain tones at the other end of the rotation. Bias affects tone and gain.

FAT:
The low end at the input of the circuit affects fuzz amount and saturation. The feel of the pedal can be adjusted from a saturated slower responding "fat fuzz" to a snappy, fast responding, slightly less gain fuzz that has the feel of a distortion or overdrive. This helps dial in a single coil to be fat or a humbucker to clear up a bit and be more sensitive to dynamic picking.


Sunday 1 June 2014

Skreddy ?Lady

I've wanted one of these for a while but they're total unobtainium so the only choice you have is build your own or pay a ridiculous amount of money.

The 2N5133's may be a little difficult to source (and as expensive as the ?Lady pro rata), so try every bi-polar NPN you've got in there and stick with the best results.  And please don't buy any 2N5133's off eBay unless they guarantee gain around 500-700 hfe.  These have already been cherry picked to death so you'll pay a lot of money for a transistor with nothing like enough gain to sound amazing in a muff.

Info from the Muff Master himself (that sounds sooooo wrong):

Skreddy Pedals™ ? Lady:
Thick and huge-sounding, this 1973-era-based fuzz is fat on chords and riffs and soars with infinite sustain on single-note runs.  Much more corpulent and "vintagey" sounding than a typical muff--it's got a bit of 60's flavor added in.
Has a wide useable tonal range with a rich midrange and an aggressive, fuzzy breakup..
Sounds like a vintage fuzz feeding a cranked up vintage amp, with as much output volume as you could ever want.