From the Lovepedal spiel:
Your quest for the ultimate Fuzz ends here.
Lots of players use it like an OD pedal or full on fuzz, even distortion.. Roll back the guitar's volume and you're left with a lively shimmer atop your guitar and amp's identity. Amazingly, this happens to an appropriate degree throughout the pedal's range, and without the annoyingly excessive boost in volume that many overdrive pedals generate. And, yes, it's dead quiet.
The Fuzzmaster is a VERY sweet, smooth, silicon transistor based, fuzz that is warm, organic and sings with sustain. While it has an UN-mistakable vintage tendency, it also has a unique voice. Vintage Fuzz Face tonal heaven and everything in between, even tweed amp tones are in there.
The traced schematic:
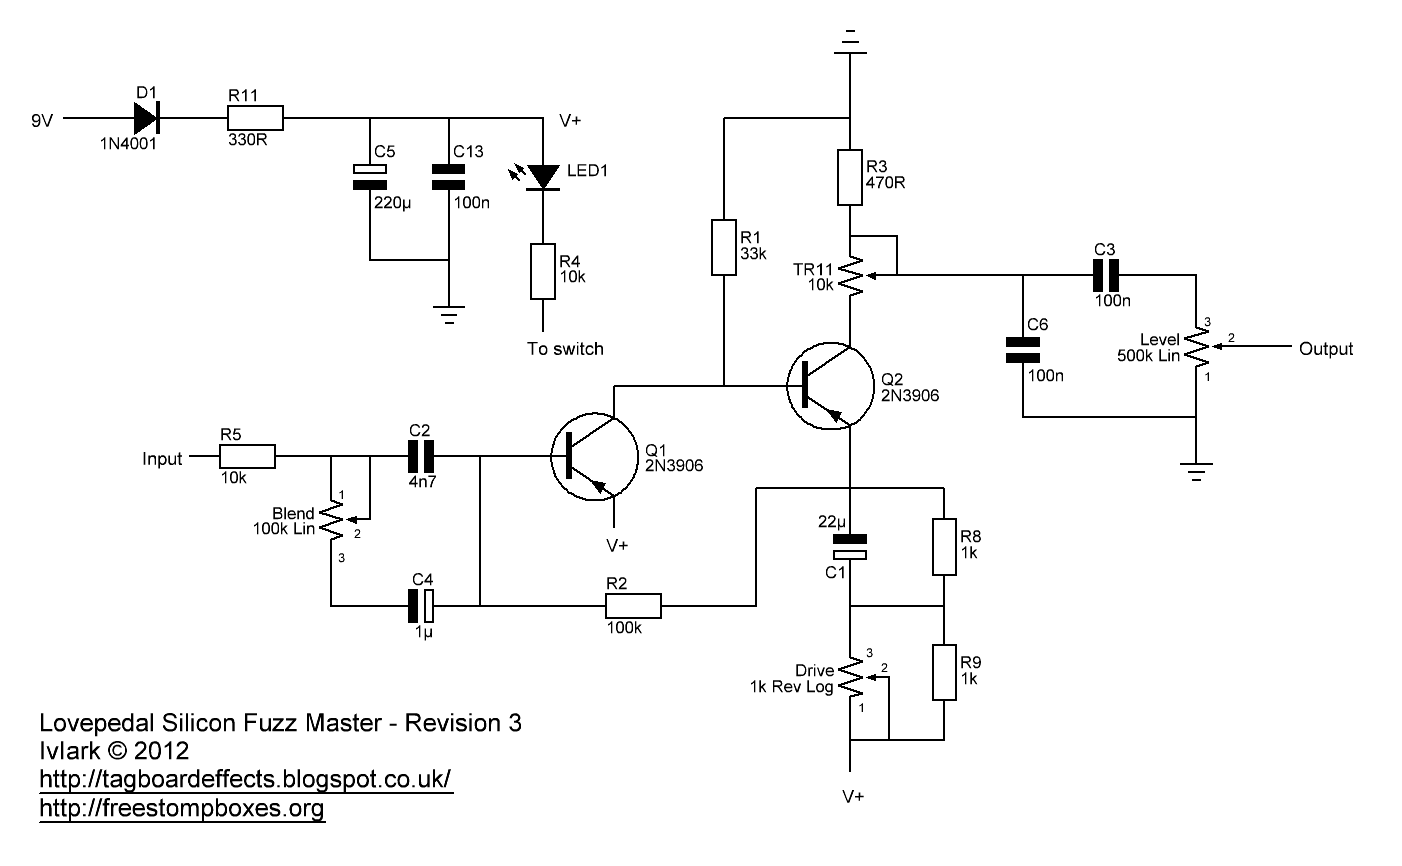
The last layout (Rev 2) seems to be fine so if you're building it don't worry, but it occurred to me that if I move a couple of the resistors around then I can save an extra column and so the following revised layout does that. In fact if you get rid of the completely unnecessary 100n filter cap at the bottom right hand side you could save another column as well. I'll leave that up to you though.

And a final compact version without the unnecessary 100n filter cap. Just build whichever one you like! :o)

Update: Schematic and layout now done from the corrected PCB layout. As an option try 33pf-47pf caps between collector and base on both transistors to help smooth things out.
G-D i, you are THE MAN! I will build it up a little later. I may make the board a little wider as to use a Bournes-type single-turn trimmer. The 125 enclosure I think does 21 or 22 wide!! Thanks and stay tuned!
ReplyDeleteHad a couple of hours with this. Swapped the trimmer with normal pot and wired it to the right edge strips 2, 3 and 4. Schematic and layout seem to match, but i can't get it working. Went it through with magnifying glass and knife, also i've reflown every joint to no avail. Also, went through every component and their location.
ReplyDeleteClosest moment was when i pressed transistors down to the sockets hard while pressing on the back side of the board. Can't even isolate what strips need to be connected to get any sound through it.
+m
OK thanks for the feedback. I'll go over the PCB again but it looks pretty much like a slightly modded Fuzz Face layout to me, but with the supply and ground swapped round to accomodate the PNP transistors in a negative ground circuit and I can't see anything that would cause too many problems. Can you measure the pin voltages and email me a couple of pics?
DeleteTry adding the new link shown above and see if that helps. It wasn't in the PCB I traced but mictester on FSB thinks that it may have been a mistake which would have been corrected with a small external link wire on the back of the PCB.
DeleteAdded that link and went everything over again.. No. Maybe i just wasn't meant to built this... :)
Delete+m
Wait until we hear back from Equinox about the PCB. The schematic and layout definitely match it but there could be some errors like mictester mentioned.
DeleteNow THAT'S what I'm talking about! That Lunar Module is too smooth.
ReplyDeleteEquinox, how accurate was that PCB? Mictester (again on FSB) is suggesting that the 22u cap wouldn't be directly connected to the emitter and would instead be connected from Drive lug 2 to the supply?
ReplyDeleteOk, the PCB layout has been updated. There were 4 errors I found!
ReplyDelete1. The left pin/via for R4 should go the the bottom layer (ground).
2. The top pin/via of C5 should go to the bottom layer (ground)
3. The middle pin/via of TR1 (trimmer) should also connect to the top pin/via of TR1 and top pin/via of R3 (I think you guys already caught this one)
4. The right pin/via of R8 that came from the right pin/via of R2, should connect to the negative terminal (top pin/via) of C1 and then onto the bottom pin/via of Q2.
Hopefully there is nothing else and we can finalize the schematic and stripboard!
I measured the following settings on the trimmer and transistors with 9V regulated power in and all pots turned fully counter-clockwise:
The stock setting of the 10k trimmer on the PCB layout is 2.73k
Q1:
1 - 1.46V
2 - 6.62v
3 - 7.24V
Q2:
1 - 6.62V
2 - 7.48V
3 - 7.93V
As indicated previously, yes, C1 (22uF) is connected directly to the transistor!
Equinox
Good thing these came up!
DeleteMark will probably update the layout and after that i'll fix my board.. My guess is that this gets verified tomorrow - considering that it's those four :)
+m
Yes you could do this:
ReplyDeletehttp://i76.photobucket.com/albums/j6/IvIark_2006/DIY/LSF-Fix.png
Hey Guys
ReplyDeleteThanks for everyone's hard work! I think we got it right this time!!
Yes, FF with some tonal/voicing changes and good output (well above nominal) and excellent fuzz characterists and versatility to tune in what one prefers, using PNPs (that I really think I can hear and superior to NPN's I've heard, and finally negative ground, so it doesn't mess with other pedals! Great design!!
It's late, but I went over the schematic. It looks rights. Only thing I would state is if you want 100% to the original design...C4 on the schamatic and layout need to be changed to electrolytic polarized caps with negative to VR2P3.
Likewise, personally I like using the Bournes trimmers, like the 3386P-1-103LF. I will probably go 20 wide like I did on the first revision and move everything after the second link to the right to allow space for the trimmer.
I'll slam one together tomorrow to verify (if someone doesn't beat me to it).
Thanks and stay tuned!
Equinox
Hi guys, I just recently found this site. Awesome stuff!!!
DeleteI intend to build this pedal, but I'm a little confused.
In the description, it is said that it uses positive ground, but in the layout it says 9V instead of -9V and you also said here "and finally negative ground", which leads me to belive that it is in fact negative groud thus, chainable with other pedals.
Can you clarify me please.
Thanks in advance
André
The description didn't say positive ground, it said it uses PNP transistors, but 9V and ground is swapped from what you would normally expect, so it is a negative ground effect.
DeleteThank you for answering so fast.
DeleteSo it is a positive ground circuit, but it was made so it can be daisychained with "normal" pedals.
Thank you very much.
No it's a negative ground circuit which just happens to use PNP transistors that you expect to see in a positive ground circuit.
DeleteOops I got it wrong the fist time.
DeleteI'll use the ICL7660S Negative Voltage Converter to make it compatible with my power supply.
Thank you very much once more and forgive my misread.
It is compatible with your power supply, it's a negative ground effect. You don't need an ICL7660S or anything else.
DeleteIvIark, thanks for all the help.
DeleteForgive my noobiness.
Couldn't get my old board to work with the jumper wire. That does not confirm that the fix doesn't work - it just confirms that my board may be beyond repair :)
ReplyDelete+m
All the revised PCB did was add the link at the trimmer (which we'd already covered with that little link) and then connect the 100K from Q1 base, and the 1K connected to Drive 3 directly to Q2 emitter, and that wire should do exactly that. If it's working intermittently if you push on the transistor is suggests a bad joint somewhere to me. Maybe reflow the solder.
DeleteNo because they're NPN, you could try any PNP transistors though. Have you boxed it yet? The shielding provided by the box should help with noise.
DeleteIf I wanted to use the electrolytic as per suggestion by Equinox, what is VR2P3, to which the negative side would be connected? Not sure what that refers to. Thanks!
ReplyDeleteMaybe I have it figured out. Perhaps the "R2" in VR2P3 refers to R2, which is the 100k resistor, and that is what the negative side of the electrolytic would be attached to?
ReplyDeleteNo he means the negative side of the cap goes to lug 3 of the blend pot
Deleteok. Thanks. Sorry - still learning as I go...
ReplyDeleteNo problem
DeleteNo, that I was trying to say is the 100k-B blend pot (VR2) "P3" = Pin 3 or VR2P3 goes to C4 (1uF/50V electrolytic cap) and C4's negative terminal!!
ReplyDeleteI see IvIark updated it in the very latest schematic with polarity! :)
Anyone verify yet?? I'll start making the board and have all of the parts...except the pots and VR1 (1k-C "drive") pot. I have the parts on the way though. I need to de-populate the last board to recover the components and and make the knew board 2 columns wider to accept a Bournes-style trimmer (personally don't like multi-turn)., so it may be a couple days before I finish.
Equinox
Thanks Equinox! I'm missing a few components so I'll be building after I receive the parts in a few days.....
ReplyDeleteThis comment has been removed by the author.
ReplyDeleteThe parts I ordered should be in tomorrow, so I should be able to slam together after work tomorrow and get this thing "verified". Thanks for everyone's support!
ReplyDeleteVERIFIED!
ReplyDeleteI had the 470R is r.2 going from Row A to Row E instead of Row D. My bad
Works perfectly. Sounds great an is quiet! :-)
Equinox
Just completed my build. With my Strat on neck and middle position, this pedal gives me a thick humbucker-like sustained mode. Great sounding pedal!
ReplyDeletewhat Hfe (gains) did you use and what did you tune the trimmer to???
ReplyDeleteI procured a 30pc sample and they varied quite a bit (134-lo, 259-hi, 178avg). Not sure what to use for Q1 and Q2.
I'll have to measure them tonight. Can't remember. As a matter of fact, I have recently thought I might like to try some slightly higher gain ones from the lot that I ordered. I'll post back after I measure. I got kind of spoiled after I built the Skreddy P19 - so much thick gain. I still like this fuzzmaster a lot though.
ReplyDeleteOn the trimmer, it's close to the middle of the trimmer. I just adjusted back and forth as I was playing until I got to a good sounding place ( very scientific, right? ). I'm still getting just a little bit of sputter on the back end of the decaying notes so I need to do a tad more adjusting. On mine, anywhere too far from that middle area (either way) of the trimmer sounded a bit nasty...
Equinox
ReplyDeleteI pulled out the transistors that I had in there - they measured 247 and 255. I found one that was higher - 263 - so I put that back in with the 255. Not a big difference. Then for the heck of it, I found two that were close to each other of a lower value hfe - 208 and 212. After swapping back and forth a couple of times, I ended up settling on the lower gain pair. I seemed to be able to bias out that hiss and sputter better. I can play a chord and let it sustain without it sputtering out at the end of the decay ( well, mostly - it's still a fuzz...). And I really haven't noticed a tremendous loss of fuzz with the lower gain pair.
Hey Tim, thanks for the feedback. As the originals were not tested or pulled, I'm curious what's the best for this? I tried many combinations last week. What I found was as follows:
ReplyDelete1. Yes, I like to have more gain on hand, so the higher the gain of both, the more available overall gain you have.
2. Yes, I had the spuddering issue of decaying notes. This is solved by PAIRING matched gain transistors and using so-called "best" values - 80/120 or 120/150 and different transistors - Radio Shack, Fairchild, etc. I could not get gains that low to test the lower values, but like I said, the more separation in values..the WORSE, so keep 'em paired up and adjust gain level to taste, again, I like to have a lot on hand, so would tend for higher values than lower. Finally, all this trial and error, I have not messed with the trim pot much yet beyond setting to original voltage 1.46 or 2.xx (cold). Again, I have not set it at 4.5V and I don't think Love does either. There could be some "majic" in there also.
I went thru many sets of transistors
You know, I didn't think about the pairing aspect in this. I guess that's why places like Smallbear sell matched sets of transistors for Fuzzes. Looking at the lower values that I chose, I guess I'm liking them more because they're closer matched, so that sputtering issue is easier to tame.
ReplyDeleteI'm going to try to match up some higher values and see how they do.
Thanks
These Connections are correct?
ReplyDeletehttp://postimage.org/image/xcqf675lv/
All the V+ points need connecting together, so yes that's right. And the other point you've queried is a junction of Q2 emitter, 100K, 1K and 22u. So no it's not a bridge, everything joins there.
DeleteIt works! I like the fuzz alot. I should probably be satisfied that it works considering the luck I have had with my last few builds... but I am getting a lot of that fizzy decay. I might try the 47pf across C and B of the transistors but I really like high end in my pedals and I find the pf caps sometimes dull things. Has anyone else noticed any of the fizzy stuff I speak of?
ReplyDeleteI got the fizzy stuff till i biased it to the voltages Q1:
ReplyDelete1 - 1.46V
2 - 6.62v
3 - 7.24V
Q2:
1 - 6.62V
2 - 7.48V
3 - 7.93V
now i get radio moscow or whatever mind you its not boxed yet.
Got the fizzles out with silver mica caps (never using ceramic again). Now it is my favorite fuzz. The blend is great. Any suggestions for a germanium in a similar flavor? I would strongly suggest silver caps between collector and base, and making room for them on your build!
ReplyDeleteThanks again Mark!!!
ReplyDeleteSchematic work with bc212a or bc212b?
ReplyDeleteYes they will work fine, just watch the pinouts
DeleteThanks, Mark, you are guru guitar effects!
DeleteEnd of the search for fuzz pedal. Perfect sound.
DeleteI have question about the update, which I believe came from Gc66. How do I do this?...as an option try 33pf-47pf caps between collector and base on both transistors to help smooth things out.
ReplyDeleteDoes this mean add a cap between Q1 Collector and Q2 Base (which I understand)? Or does it mean to add a cap between the Collector and Base of Q1 and then another cap between the Collector and Base of Q2? If it means the latter, how do I do this?
hello there i didn't make to trace a rev log pot all around Athens... Unfortunately i have all the pedal ready and the only i need is the pot... Is there a possibillity to make it without the rev pot in use of a lin or log pot?
ReplyDeleteJust use linear, definitely don't use log.
DeleteTake 2k lin pot and solder an extra 2.2k resistor between lugs 2 & 3. That should be close enough. You can of course use 1K lin, but the sweep won't be as good as most of the usable range will be at the very end of the sweep.
Delete+m
Thanks a lot the two of us ... The faster response ever... :) U R gr8!!!
ReplyDeletebuilt it, like it :)
ReplyDeletebought 100 2N3906's and all was in range of 330-350 :(
i had hopes for some around 200 but NOOT.
i biased Q2 collector to 2.5V, 1.3V sounded like the speaker got stabbed with a knife
and at 4.5V sound got very tight more like a overdrive and this is a fuzz build so
i went for 2.5V.
it sounds just like the PGS demo where he plays nasty dogs and funky kings
and on same settings too :)
gonna try some lower gain transistors when i get some, Tayda is a cool place but not so much for trannys, but the other stuff is okey i guess....and real cheap :)
nice project and pretty easy to score :)
Try some 2N3703's if you see any for sale. They're really low gain, similar to the common germanium gain levels.
DeleteI wonder if this is similar to the Lovepedal 200LB fuzz...
ReplyDeleteAnywho... built this one and I love the sounds I get so a KEEPER!
thanks IvIark!
This comment has been removed by the author.
ReplyDeleteMaaaan! Just built this with a high gain germanium FF set 124/172hFE. 120p to tame Q1, 330p for Q2 a la DAM. External bias a la Sunface, 2k2 + 5kB pot. 500kC for volume pot. Now that's my favorite fuzz build and I've made quite a few so far. No worries for positive ground anymore, and high gain germaniums. Before boxing it might have a little his, (my OC42s had that) but in the box disappeared.
ReplyDeletehttps://fbcdn-sphotos-h-a.akamaihd.net/hphotos-ak-xpa1/v/t35.0-12/1614540_929073067110366_626988855412528750_o.jpg?oh=c98db84962aee6c7cb7a8307108eb220&oe=54707B46&__gda__=1416725630_1b8f464aad74ff29ceb02ad2a1450089
Great job, thanks for the pic
DeleteThank you for inspiring me!
DeleteA better pic, I really like how it came out. So manny benderish tones with OCs.
https://fbcdn-sphotos-f-a.akamaihd.net/hphotos-ak-xfp1/v/t1.0-9/q81/s720x720/10388667_930815946936078_5507320876532091542_n.jpg?oh=b04179f9c5daa1430ffe343d5208d687&oe=5515FBA9&__gda__=1423621376_61ea9b15897a97b79426fd507fcd2fc6
Looking at The suggested bias values: why there is not a pair of values that are The same for both transistors considering that they share a common point?.
ReplyDeleteIve built this but i dont get a fuzzy sound, its warm and quite clean.
Any suggestion?
This comment has been removed by the author.
ReplyDeleteThis comment has been removed by the author.
ReplyDeleteI think the better choice is 2N3906 as per original, I tried 2N3703 low gain with very poor results.
DeleteMy 2N3906s have hfe 248/298 and I used 47pf to tame both.
Very cool and warm sound!
This comment has been removed by the author.
ReplyDeleteHi!
ReplyDeleteIs possible to tagboard it???
Thanks!
Sorry if I ask too much :-)
I am getting 7.95 volts on Q1 collector. How do I get it down to 1.46 volts? Please help.
ReplyDeleteBuilt the bottom version one today, worked first time very happy one of the best sounding Fuzz`s for me so far. Stuck to original build no changes Many thanks Mark!
ReplyDeleteForgive my ignorance, but what component is the green rectangle in the upper right corner?
ReplyDeleteThe 10k trimmer
DeleteHi. I’d tried two times this pedal, with the same problem. The first one, a pcb layout using the schematic above. The second, breadboarding using again this schematic. The same values for every component, checked one by one.
ReplyDeleteWhen I put the drive pot to the max, appears a very loud noise. It’s between 95% and 100% of his position.
The only common component used for both attempts was the C1k pot. I tried with a B1k, and the problem persisted.
Can someone help me?
Did you figure out the 95-100 issue I'm having same problem
Delete