Pages

Tuesday, 9 December 2014

Rockett WTF

7 weeks I've had a bloody trapped nerve in my back now, but I thought I'd better at least attempt to concentrate enough to do a layout every so often so you don't get bored.

The B%st pot is just a second volume control with the B%st stomp selecting between the two.  I have shown the B%st LED connections for the switch, and to complete it you will need to connect the anode to 9V via a limiting resistor to taste.

Info about the original:
The WTF Fuzz is the fuzz for people who don’t like fuzz! Get mild OD sounds all the way to crazy random octave fuzz. You can achieve sounds similar to a trumpet or trombone as made famous by Paul Trombetta, who created this circuit for us….Thanks Paul!!


Thanks to Matt for the schematic for this Bosstone based effect.


and a modded version following suggestions from Paul Trombetta


BUY A KIT

Saturday, 15 November 2014

May I? Vox in a Box

Thought i'd post this here too in case someone wants to try it out. There's an old development thread on FSB for this AC30 emulation circuit. There are number of schematic versions with slight differences, but the basics are the same for all of them. It is a nice high gainer with some noise content, so i'd suggest using 220µ for the power filter and maybe adding a 100p cap between germanium transistor's base and collector. I built one to see if the layout works and it's good to go.


Monday, 10 November 2014

Madbean Poindexter

Madbean's modernized take on Ibanez Standard Fuzz and alike. From discontinued project files.

Saturday, 8 November 2014

Moen Fuzz Moo

A great sounding and cheap Big Muff made in China by Moen which I believe is a clone of the now defunct Righteous Tones Sonic Mayhem.  I bought one of these before I got too heavily into DIY and it got plenty of use despite me also having a Skreddy Pink Flesh, so it's definitely a recommended build.  The 100K in the tone stack means that it isn't as scooped as some Muffs which is probably why I get on with it so well.


The PCB:


Info about the original:
Fuzz Moo Analog Fuzz Box Analog Sustained Fuzzy Distortion: Like any other MOEN Effects Pedal, the Fuzz Moo is designed with analog circuitry to ensure full processing and reproduction of the original signal without losing any details through digital sampling or processing. I have been playing with this one and it's pretty meaty with alot of headroom available. Kinda like an very early 70's Fuzz sound, but it is pretty flexible in acheiving different levels of raunch. Note.. when I say it kicks back, I mean it. There is a lot of gain in this box. This pedal will fight you back, but that is why everyone like its. When A/B'd in a studio against the Muff and some other well-known Fuzz boxes.... the Moo stomped all over them!! Very musical and workable Fuzz tones. Not one to pass by !!!


And the schematic using Pawel's drawing as a template, which I traced from my original:


Tuesday, 21 October 2014

Madbean Bacon Bits

Basic info about a Madbean original:
The BaconBits Booster is a simple op-amp based booster powered off a split rail supply. It can be used as a stand-alone boost to drive the front end of a tube amp or another effect such as an overdrive. The BaconBits utilizes an input buffer which feeds into a negative feedback gain stage. The result is a clean, high headroom boost that adds a lot of “shine” to the guitar at lower boost settings and dynamic, sparkling overdrive at high boost settings.


Saturday, 18 October 2014

Boss DS-1 Distortion

There's very little point in building a 1:1 clone, as you can score the original unit for peanuts as used. Possibly even cheaper than what the parts alone would cost you to build one. But instead of going through a painful bypass operation on a Boss box and having your way with the circuit, you can build your own and mod it to the perfection for yourself. There are a number of mod ideas on the web for this circuit.

The original units use Mitsubishi M5223AL SIP chip and 2SC2240 transistors. Since M5223 is still just a pretty standard dual opamp, any of our usual choices (JRC4558, TL072, NE55532, etc.) will work fine. Or in some cases, even sound way better than the original. The second transistor (the one on the top on the layout) is your first gain stage, so i do recommend socketing that one and the opamp to try out what suits you the best. The size of the board is slightly bigger than what i usually go for, but since it's 17 rows in height, this'll fit nicely in 1590B if you mount the board sideways. I built one already to see if the layout works and made a few value changes on it. 2N5088 + JRC4558 gives a mean, nearly sadistic texture for the distortion, upping certain cap values will add a ot of bass content and 5mm yellow LEDs for clippers make this one sick fuzz..


Saturday, 11 October 2014

EHX NYC Big Muff

Request.  Everyone knows what it is so I'll leave the description to Mike Matthews:

The NYC original. Hendrix and Santana were among the first to get a piece of the Pi, and for over 40 years the Big Muff Pi has been defining the sound of rock guitar. Revered by contemporary guitarists and rock legends for its rich, creamy, violin-like sustain, from Pink Floyd to The White Stripes, everyone still wants a piece of the Pi!


and the schematic used for the layout


Thursday, 9 October 2014

Ace Tone FM-2 Fuzz Master

Slightly modernized layout for a forgotten classic. Transistor pinout is per the transistors you most likely have already. Original has C369s, which are rare and have a different pinout. There's added series polarity protection and for the clipping diodes, you may use what you like the best. Schematic i have doesn't specify which are used on the original, but i suspect those may be 1N34A or similar Germanium diodes. You should get a bit more output level with modern ones like 1N4148 etc.


Here's another version of the board with Beaker's modifications as discussed below. The switch and the poor "Fuzz Adjustment" controls have been replaced with tone pot that's way more usable and the volume control on this one should allow higher output levels.


Wednesday, 8 October 2014

Ruby Tuby

Request.  This is based around the Runoffgroove LM386 Ruby, but with an IC preamp, into a 12AX7 section, and then into the LM386-N3 power section.  Sounds pretty good in the clips which you can hear at:

http://www.sophtamps.ca/mambo/index.php?option=com_content&task=view&id=28&Itemid=39

This needs a 12VDC supply, so if you're using an unregulated one like the one mentioned in the circuit information then you may want to include a 12V regulator to stabilise it.


Monday, 6 October 2014

Soulkitchen Heavy Darling Fuzz

Wanted to do a quickie, so this seemed like a suitable circuit and we didn't have it on the library yet. Not a lot of info around.. One could play around with the value of that 10µ cap to see how 22µ or even a 100µ affects the tone. Maybe even make it switchable. Either way, this should fit nicely in 1590A.

A friend of mine knew this circuit and recalled asking around for a demo clip. Back in 2008. Now, today, we finally have a demo. Huge thanks to HarmRazorback! Very nice playing man!


Sunday, 28 September 2014

Blade VSC Preamp, modified

Ran into a schematic of a preamp on-board circuit found in Blade brand guitars. The original called for LM4580 dual opamp, other channel unused. So i drew this layout for a single channel chip and added volume control, power filtering etc. You could try on a number of single opamps to see which sounds best to you. I'd also suggest trying linear taper for volume control. Should make a nice mids booster or a simple box that'll fatten your tone.


Monday, 22 September 2014

HBE Power Screamer

Haven't counted, but i believe we have fair number of Tubescreamers and derivatives listed here. And here's one more. Tweaked with couple of mods to low frequency response and gain. Switchable diodes etc. The boost switch is a stomp and with 2PDT you can use the second pole for a LED. I've omitted the 27K resistor from the output, but if you want yours verbatim, just solder 27K resistor between Level lugs 1 & 2.

The Power Screamer is our flagship pedal. Tonally wide ranging and transparent, The Power Screamer "oozes" vintage, tube like overdrive. Based on the JRC4558D The Power Screamer features: Adjustable Gain, Level and Tone controls, 3-Way Diode Select and footswitchable Boost.


Sunday, 21 September 2014

DOD FX56 American Metal

I think Mark would have squeezed this in a bit more compact size, but i got it "down" to 21x29. So super brave folk may aim for 1590B, but rest of us may want to give this a go with 125B or 1590BB instead. Layout is based on a schematic which was provided with the original units, along with stickers and other paperwork. Circuit has some similarities with Boss HM-2 Heavy Metal as the youtube demo below suggests. Sounds pretty mean.


Wednesday, 17 September 2014

EHX Germanium Overdrive

Thanks to Miro for the excellent trace job he did on this.

Hope you're stocked up on 470nF caps.  They were all polarised but I have shown poly for the caps with a 5mm pitch because I expect that is what most people will use.  I have shown electrolytics for the two with only a 2.5mm pitch just so people know the polarity if anyone would like to build it with electrolytics, but again I expect most would use poly or maybe 2.5mm multilayer ceramics for them.  Any PNP germanium can obviously be used an an alternative to the NKT275, and I suspect more people will have 2N3906's in stock than 2N5087's, so try those for Q2 and Q3.

Info about the original:
Classic '60s Germanium transistor overdrive and more. In addition to a Gain control, the Electro-Harmonix Germanium OD allows the user to control Bias for attack and the circuit Volts for that sweet spot found when a battery's voltage dips. Dial up that slightly torn speaker sound OR dial in total Germanium "Satisfaction."

Germanium is an element like carbon or gold. Germanium transistors were used extensively back in the 1950s and ‘60s. Eventually they were replaced by components that were considered “better.”  The EHX Germanium OD and Germanium 4 Big Muff Pi use these old school transistors. They have a distinctive sound, some say smoother or “spongier.” You be the judge, hear the Germanium OD here.


and the schematic


Thanks to ξεναγός νεκρόπολης for verifying and providing the following working voltages.

Q1
e 5,41
b 4,17
c 3,76

Q2
e 4.37
b 3,75
c 0

Q3
e 3,02
b 2,43
c 0

Monday, 15 September 2014

Ibanez BB9 Bottom Booster

Here we go with one of my personal favourites. To me, the sound is simply amazing. As Dirk's notes on the schematic suggest, you won't be saving any money by building this. New ones sell for pretty cheap and one should be able to score a used one for a very decent price. I still wanted to see how compact i could possibly get this and yes, i'm rather happy with the results. I did cut a few corners though. I omitted the six 100n power decoupling caps from each opamp as adding those would have made this way bigger (let's just hope this doesn't add to noise floor). The input resistor is 12k on this layout, but to make it verbatim, you should take 5k1 and 6k1 resistors in series in its place - or a value of 11k2. I also dropped the 100k resistor and 47p cap from the output. If you want to add those, just solder them between lugs 1 & 2 of the Level pot. I also made a couple of small changes to the power supply section input. I burned the LT1044 on my original unit, and that was way easy to do. So i added series protection and a zener+100R resistor after that. Should be pretty fool proof like this. Charge pump produces +9V/-9V swing, so you're safe with your 16V rated electrolythic caps. Should be a nice fit for 1590B.

Snippet for the marketing text:
Sometimes it's best to keep it simple. Which is why, in a world of dizzying often over-complex technology, the durable, dependable, and simple stomp box continues to be the most widely used and effective means to expand, color, distort, mutate, sustain, and twist tone. The Ibanez BB9 is a booster that provides a fat bottom end with a powerful sound, perfect for the player who wants to push their amp into overdrive without losing any of their low-end. This pedal is designed to help clean tones reverberate even more and bring more intensity to a player's sound. Combine it with a distortion pedal to create of a wide variety of tone colors.


Thursday, 11 September 2014

ROG Britannia

Here's a challenge for those who want theirs in  1590B. Should fit, but it'll be a challenge.

From ROG:
The English Channel was our first attempt to adapt the Vox AC-30 Top Boost amplifier for use as a guitar pedal. Released in 2004, the English Channel was a straightforward JFET implementation that was heavily based on the amp's schematic using the so-called "FET by numbers" approach. While this approach did certainly capture the amp character to certain degree, the overall sound of the resulting circuit was not as refined as its valve counterpart.

Through the years since the English Channel was released, we've been polishing the manner in which the different valve stages used in guitar amps are adapted to JFET-based circuits. This involves taking several aspects into account, such as the effective frequency response of the stage after considering parasitic capacitances, input and output impedances, gain and dynamic range, and clipping characteristics. Furthermore, in some cases we have taken the artistic license to replace certain portions the circuit with something that provides the intended function without necessarily looking like the original circuit.

Now we present Britannia, a fully redesigned adaptation of the AC-30 for use as a guitar pedal which has been optimized for playing into a clean solid-state amp. We hope that you will find this project a nice approach to the sound that was made famous by many artists, including The Beatles, Tom Petty, The Edge, and Brian May, to name a few, without having to invest in or carry around the real thing.

Here is the usual circuit walkthrough for those interested in the savory details: First, Q1 is our standard high impedance input stage, very "booster friendly" thanks to the two red LEDs at the Gate. Next, you will readily recognize a scaled version of the Gain control section, which together with Q2 form a treble booster. You will also notice that all JFET stages but Q2 are prevented from clipping hard by virtue of the back-to-back diodes present at each Gate. This helps retaining the sweetness and dynamics of the sound. However the original amp has some degree of grittiness in it when pushed hard, and this is achieved specifically by Q2, which is a high gain stage borrowed from the Omega booster. Apart from its higher gain, this stage is generous in 2nd order harmonics. Then comes Q3 as a voltage follower driving a slightly modified version of the original tonestack. Some additional gain is provided by Q4, then a cousin of the original Cut control, which in our case was wired backwards with respect to the original, and therefore labeled Brilliance. Next, the op-amp U1a provides the final touch of soft overdrive, followed by U1b that implements the ultimate toneshaping: a 200 Hz resonance characteristic of a 2x12" cabinet and some high frequency rounding.

Jon Patton's official demo:


Working voltages as posted by ξεναγός νεκρόπολης:

q1
d 6,05
s 0,89
g 0

q2
d 5,06
s 2,42
g 0

q3
c 8,55
b 5,62
e 5,43

q4
d 5,42
s 1,10
g 0


1 4,21
2 4,21
3 3,8
4 0
5 2,09
6 4,21
7 4,21
8 8,43

Saturday, 6 September 2014

Nick Greer Green Giant

Request.  Sorry Zach (rocket88), I was in the mood to do a quicky and this fit the bill nicely :o)
This is very close to the Ghetto Stomp and probably could be thought of as a cut down version with saturation control on the diodes.  Oh another pedal that used it before Fuller's ridiculous patent!
Anyway, a nice quick one for anyone with half an hour to kill.

Info about the original:
One of Nick Greer's personal favorites. Formerly built by Greer Amplification for endorsers only. A basic distortion unit with a limiter between the output of the signal and the clipping section of the diodes. The knob is labeled clean mix and allows the user to limit the amount of signal being distorted, resulting in a sound much that of the clean signal being mixed in on top of the distorted signal. Great for country players and rock and blues players who want good sounding distortion with the ability to dial the amount of hair. 


Friday, 5 September 2014

Test box 2.0

We always recommend trying the boards out before soldering everything in to the enclosure. Main reason being that if you have an error on your build, it's about a hundred times harder to find it inside the otherwise finished build. Like Madbean says - Build it, Rock it, Box it. There is a reason for that order. One could, of course, simply use a breadboard and/or simple screw terminals to achieve the same goal, but if you are building more than one circuit every now and then.. Well. Then i'd suggest you'd build yourself a test box. I've had a few different methods of trying the boards out before boxing, but my latest, equipped with a little more sophisticated screw terminal block was closing in on the end of the road. It was simply falling apart due all the use it had seen. So. I wanted to build myself a new one with slightly more features than the previous one. And while i was at it, i snapped a few (poor) shots of the process. A slight warning: This "photo essay" may not be detailed enough for someone who's doing anything like this for the first time. But if you know what you're doing, you're more than welcome to try something similar out. Here's my "Test box 2.0", which includes a switchable audio probe input. Let's start out with what you'll need.


Most things needed are your standard pedal parts.
  • Enclosure (i used a plastic box that can be found through Tayda)
  • 4-way speaker terminal and bolts/nuts for it (again, Tayda)
  • 2 mono jacks
  • Binding post for "banana" connector (mine isn't exactly like this, but once again - Tayda)
  • 3PDT On-On toggle switch
  • DPDT On-On toggle switch
  • 1µ polyester box capacitor (higher the voltage rating, the better)
  • Small piece of stripboard
  • 2 LEDs (i used diffused red and orange)
  • 2 1K2 resistors for the LEDs
  • Holders for the LEDs
  • A few meters of wire of your choice
  • Heat shrink tube etc. etc.
I drilled the enclosure first and started with mounting all the ingredients. Due to location of everything on my bench, i went with jacks on the left, speaker terminals on the right, DC jack on top and probe binding post at the bottom. I Placed the switches on the upper half, because it just looked like that would be a good place for them. The LED holders are below the switches. You should probably think the geometry of all the parts so that it'll suit your needs and bench.


Next up, we'll wire the grounds. The DC jack pictured here has its longer leg as sleeve and shorter as tip, so we'll take a wire from the short one to lug 2 of the DPDT switch - and from that pin to the second speaker terminal lug - and from that to input jack's sleeve - and from that to output jack's sleeve - and from that to lugs 1, 4 and 5 of the 3PDT switch. Here's picture of all the grounds connected:


Now, the small piece of vero. We're using that as a tiny daughter board for our LED resistors, just to keep everything neat. 4x5 board is enough. We'll wire two red wires to one row with two resistors and one wire for each row that has the other end of the resistor. Those wires are for the LED anodes. Like so:


Now we can wire up all the "hot" leads inside the box. To attach the tiny board to the enclosure, i used Tesa PowerBond Outdoor branded two sided adhesive tape. 3M's similar product doesn't insulate the connections, so do not use that. With slightly bigger board one could use a plastic, or even metal PCB standoffs, but i've found the Tesa tape to be sufficient solution. LEDs go their respective holders (i'm using red for bypass/3PDT and orange for probe/DPDT) and cathodes need to be soldered to lug 3 of the DPDT and lug 6 of the 3PDT. The longer free red wire goes to DC jack's sleeve and the shorter to the first speaker terminal lug.


Now we have all the grounds and supply wires hooked up. Next we'll need to solder up the signal wires. Connections are pretty much per the standard outboard wiring, but please do read this twice to make sure you got it:
  • Green wire - from 3PDT lug 2 to speaker terminal lug 4
  • Blue wire - from speaker terminal lug 3 to 3PDT lug 9
  • Yellow wire - from input jack's tip to 3PDT lugs 3 & 7
  • Orange wire - from 3PDT lug 8 to DPDT lug 4
  • Brown wire - from DPDT lug 5 to output jack's tip
All that wiring is depicted here:


We're pretty much all set, but the probe section is still missing. The box does work as it is now, but there's no use for the binding post and the DPDT switch does nothing - but light up the LED when set to probe mode. Now we'll need to solder two wires to the 1µ capacitor. Like this:


Other end of that wire is then fastened to the screw at the bottom of the binding post. The other end needs to be soldered to DPDT lug 6. I used a small piece of the two sided adhesive tape to keep the capacitor nicely in one place. Like so:


That's it. Simple and straight forward. The 3PDT bypass switch acts as a true bypass in the same manner as in any pedal. The speaker terminal connections are the ones where you'll snap in your just finished new effect board. One for supply voltage, one for ground, one for circuit input and one for circuit output. Here's a shot of the thing in action:


Some of you may think "why add the binding post for the probe?" Here's the reason - let's assume i've built a board, hooked it up to this box and it doesn't work. There's no signal passing through. We already have the ground wire for the circuit connected, so why should we rip out all the cables (excluding the supply/ground) and clamp an alligator clip to a ground point on circuit, plug the probe to the amp and start probing? For no reason. With this setup, we can simply connect a multimeter's test lead to the binding post, flick the probe switch and start probing. Even when debugging a broken factory pedal, this solution eliminates the need for a separate probe. Just connect that pedal's grounds to the ground slot of the speaker terminal and start probing.

How am i going to remember which of the speaker terminal slots is which and which jack is which? I'm probably not going to, so. I added some Dymo tape to mine...


I = Input, O = Output, G = Grounds and V = voltage in. Don't bother pointing out that the speaker terminal is upside down. It isn't. This way i can snap the wires in without having to lift the box off the table.

The idea for this box is rather simple and you should be able to add the features you want/need. Like for example - a negative charge pump and separate 2-way speaker terminal for the -9V and ground. That feature would enable you to try out positive ground circuits with the same test box. Why i'm not doing that? Because i have a lab supply on my bench and i want to be able to try the circuits out with higher voltages than just 9V. So ICL7660S with maximum input of 12V doesn't really suit my purpose.

One last thing. If you don't have a lab power supply with quick fuse, please do not test your circuits with a wall wart power supply. Even the slightest short will burn your supply or its regulator in a heartbeat. For testing purposes - solder a standard DC plug to a battery snap and go with that. You'll be able to drain a battery in ten seconds with a short, but it'll be a lot cheaper than burning wall socket adapters.

Tuesday, 2 September 2014

Jim Dunlop CryBaby GCB-95

While I've got the wah template loaded I may as well add this one too :o)
Again thanks to mmolteratx for the schematic.

Info about the original:
When people talk about wah-wah pedals, they’re talking about the Cry Baby Wahs. This is the one that created some of the most timeless sounds in rock. The pedal that would eventually become the Cry Baby was first created in 1966 by engineers at the Thomas Organ Company. This new and expressive effect was an instant hit with players like Jimi Hendrix and Eric Clapton, who have contributed to the Cry Baby Wah’s huge popularity to this day. While other effects have come and gone, the Cry Baby Wah just keeps getting better with age.


Monday, 1 September 2014

Effdub Flapjack OD

Stumbled on to an older Effdub design. This one's based loosely on the Hot Cake and should deliver similar overdrive sounds. Could even solve the oscillation issues a few folks experienced with our original Hot Cake layout.


Sunday, 31 August 2014

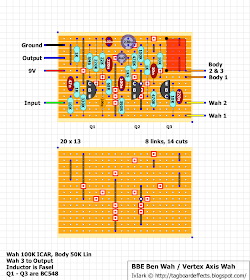
Vertex Axis Wah / BBE Ben Wah

I put this on hold because the inductor used has a number of connections and although only 2 of them are being used it may make it difficult to mount on vero.  So I will put it on hold and maybe look at doing a daughterboard for the inductor, or maybe even using a different type like a Fasel which will be easier to mount on the vero board.  If anyone has any inductors they want to try then post info about them and I'll look at the best way to adapt what you have to this layout with possible just a couple of extra links required.  

Update 2: I have changed the layout to incorporate a Fasel inductor for the time being, but will add mods for other inductors as required.

---------------------------------------------------------------------------------------------------------------------

Thanks very much to CodeMonk for all the hard work he put into the degoop and trace.  I think most of you will know this story already.  Basically Vertex have been selling their Axis Wah for $349.99 and it turns out that it's a verbatim $149 BBE Ben Wah which has been gooped and relabelled despite Vertex claiming they were hand made in the USA with custom wound inductors.  They even sell a NOS version which is $50 more, and which has absolutely no NOS components in it, just the same BBE board with a different pot.

So basically it's the modern day Freekish Blues story with the other similarity being that Vertex are another TGP favourite and some people on there with absolutely no self respect will still argue Mason from Vertex's case and not hear a bad word said against him.  Amazing how fanboyism can turn some peoples' brains to mush to the point they refuse to acknowledge the damning evidence staring them in the face.

I love guitar effects, and companies like Vertex and Freekish Blues give the industry a bad name, making it difficult to trust new manufacturers and products on the market for fear that you're being ripped off.  Hopefully when Vertex endorsers like Landau realise what company they are associated with, Vertex will go the same way as Freekish Blue.  Just beware for Mason's next company popping up in a guitar shop near you!

For anyone who would like to see more info about it you can check out this web site where you can see some of the degoop pics along with a hilarious rebuttal from one of Mason's cranially challenged TGP admirers.  Worth a read:

http://www.ripoffreport.com/r/Vertex-Effects-Mason-Marangella/Point-Richmond-California/Vertex-Effects-Mason-Marangella-Desperado-on-Huge-Racks-Inc-and-The-Gear-Page-Decepti-1166892


In next weeks episode.  How Vertex's totally gutted and rebuilt (in USA allegedly) Boss volume pedal is in fact a Boss volume pedal with the tuner out components removed [shaking head facepalm smiley required].

Out of respect for the manufacturer who deserves the credit I'll include BBE's marketing first:
Ben Wah is based on a 1967 Class A circuit design that featured the unique Halo inductor. We re-engineered and custom-tuned the Halo inductor and potentiometer to re-create the expressive tones made famous by players like Eric Clapton, Jimi Hendrix and Stevie Ray Vaughn. All components are hand-wired for the ultimate in vintage authenticity

We didn't stop there. Ben Wah adds amazing versatility thanks to its “Harmony” control to help fine tune the Q/peak response. The verdict? Guitar Player Magazine had this to say in a wah roundup article:

...the BBE Wah has the sweetest, most musical voice of the bunch. Its potential to be a first-pick wah for any kind of music earns it an Editors' Pick Award. - Guitar Player Magazine"


and now Vertex's:
The Axis Wah is the finest representation of a 1960's style Wah with a few modern additions. It is designed to produce the most vocal characteristics reminiscent of the classic Wah tones we know and love, yet provide a smooth and rounded top-end that doesn't get too bright. Each unit includes our custom hand-wound HALO inductor, hand-made custom potentiometer, and hand-picked components to give this wah its distinctive voice.


Hmmm sounds similar?


This layout uses a Fasel inductor instead of the Eleca used in the BBE simply because it is more suitable to mount on vero.  If you prefer to use the original Eleca then I will do a separate daughterboard that will take into account the pin arrangement in the Eleca


Saturday, 30 August 2014

Maestro FZ-1 Fuzz-Tone

Request.  This effect needs a 3V supply and is a positive ground effect so I've included a 3.3V regulator and an ICL7660S to provide the -3V (ish).  You can omit that and power it with a pair of AA batteries or standalone 3V power supply if you prefer, but if you do remember to wire it as a positive ground effect.

Consider socketing the 1K5 resistor to experiment with values to get the best sound out of it, or maybe replace it with a 10K trimmer.

Description from Music Radar:
"The daddy of all stompboxes: the first commercially produced transistor-based guitar effect pedal and also the first fuzz box. First made in 1962, it took until 1965 to catch on when Keef used one on Satisfaction – and the world of guitar tone was changed forever. The FZ-1 used three germanium transistors to amplify and clip the guitar’s signal creating fuzz, glorious fuzz…"


Wednesday, 27 August 2014

CBS Arbiter Doubler

Thanks to Pawel for his schematic posted on FSB.  I can't find much info on this one or clips, but it is very close to being a Foxx Tone Machine so that should give you a good idea what to expect.

Pawel traced two units with the second being slightly different, using BC109 transistors, the 100K Q3 base resistor is 150K, the 5n cap is 3n3, and all pots are 100K log, so build whichever one takes your fancy, or socket the positions to try both.

Demo of the British Pedal Company Doubler which is a copy


Working voltages as posted by ξεναγός νεκρόπολης:

q1
e 1,11
b 1,65
c 3,95
q2
e 3,49
b 4,02
c 9,08
q3
e 0,56
b 1,16
c 3,55
q4
e 0,21
b 0,78
c 7,82

Wednesday, 20 August 2014

Freekish Blues Alpha Drive

As pretty much everyone must know by now this pedal was a re-badged Joyo Ultimate Overdrive with 3 resistors added, and that in turn is a very lightly modded OCD.  But the TGP favourite Freekish Blues Alpha Drive does still have a lot of fans who will argue to their back teeth that the sound in more important than being deceived, bent over and shafted by a builder.  So I thought I may as well include a layout so we can build one and see for ourselves whether it is indeed worth losing all self respect over.

This could have been made simpler by using pot values which more closely matched the originals + parallel resistors but I didn't want to do that because this method will give you odd tapers which may be part of the "magic", and so I wanted this to be exactly as per the Alpha Drive.

The Joyo UOD made a couple of small changes from the OCD, including a couple of value swaps and a slight variation in the mosfet clipping.

I do expect this will sound and feel different than both the Joyo and the OCD, so certainly worth a build even if it's just for comparison purposes.  But I would like to stress that the $35 Joyo is extremely close to the $160 Fulltone OCD for those in the market now Voodoo Lab has stopped making them.

Amusing original BS:
Freekish Blues is proud to present one of the best overdrive pedals on the market:

The Thaddeus Hogarth Signature Pedal: Alpha Drive

Working closely with the east coast singer-songwriter, guitarist and Berklee Guitar professor, Freekish Blues has developed an ultra-sensitive, clear, amp-like overdrive pedal that cuts through where others fall short.

Thaddeus, an award winning guitarist has been using high end Dumble or "D-Style" amps such as the Two Rock Custom Reverb Sig 1, Ben Harper's 100 Watt Custom Reverb Sig 1, Bludo Bludodrive, and the Quinn SDO in his line-up for some time.

He had been in search of the ultimate versatile pedal that could deliver those tones along with a wider range of tones from rock to blues, from classic to contemporary and fusion. Even a relatively clean boost is possible with this pedal! The Alpha Drive has a very smooth but articulate quality that one will find pleasing.

This pedal has been played against some of the finest Dumble style amps and pedals on the market today. Pedals such as the Ethos Overdrive, Zendrive, Dumkudo & Zenkudo pedals. That being said the Alpha Drive at this price can't be beat.

The controls - Volume, OD and Tone - actually make a difference, and the pedal cleans up with a lowering of the guitar volume. Featuring a true mechanical bypass foot switch and internal components normally found in the circuits of tube amplifiers, this pedal is built like a tank! The battery can be changed in seconds with the easily accessible secure battery cover. No screwdriver required.

The Switch: The Rock up switch gives a little bit more of a midrange presence edge allowing you to cut through. The Blues down switch gives you that warm brown bluesound. This would be great for the folks who have single coil vs hum-buckers or just to get an extra bite, depending on the instrumentation in your band...I like both, depending on the song.. The switch acts very similar to a Dumble Mid Switch.

Here's what Thaddeus himself said

"After a lifetime of amps and pedals, I was in search of the ultimate do-it-all overdrive pedal. Of course I had been using Dumble-inspired amps for many years, but my love for the traditional sounds of the tube-screamer and even the sound of a cranked deluxe reverb fueled my desire to create a high-quality pedal that covered all the bases. I think of this pedal as an extension of my instrument rather than an effect. You can leave it on and turn the OD control all the way down to get what amounts to a clear boost, or you can dial in varying degrees of overdrive all the way to full sweet fat saturation! The overdrive and the volume control are interactive, very much like tube amplifiers with a gain and master control. The tone control actually works! I am very proud to have my name associated with such a high quality product created by my family at Freekish Blues. I hope you all enjoy many great times making music with this pedal!" - Thaddeus Hogarth


Thanks Ken


Sunday, 17 August 2014

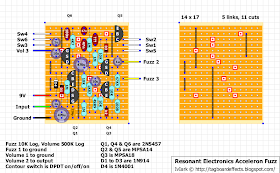
Resonant Electronics Acceleron Fuzz

This is a really great sounding fuzz and definitely something different from the norm, so props to Resonant Electronic Design.  You'll notice on the layout there's a cap marked ??? and as you can probably guess the guy who did the trace didn't get the value of that one.  Looking at it though I suspect is may be a 2u2 poly cap because it is next to a 1u poly cap on the board but is physically larger.  I would definitely suggest socketing that one to test, but I think 2u2 is the value I'd try first.  The polarised 1u and 10u caps in this are tantalum and the 470u at the bottom left is rated at 6.3V which should allow you to keep the dimensions down for that one.  The 470u cap in the centre is the main supply filter cap and so will need to be rated sufficiently for the supply you intend to put in it, but if you're using 9V then a 10V cap should be fine as the series reverse polarity protection diode will be shaving around 0.7V off the voltage anyway.  Thanks to skywise for the pics and trace and mmolteratx for the scheme.

Info about the original:
Most guitar players either love or hate fuzz pedals. We found ourselves on the fence. We love the classic tones of Fuzz Faces, Tonebenders, Big Muffs, and other early fuzz designs, but many of them are prone to splatty, overly-compressed sounds when set to anything but the optimal settings. Modern fuzzes can do some amazing tricks and can produce some unique tones, but often they are one-trick-ponies relegated to the bridge of a song, random use during late-night jams.

We wanted to design a fuzz pedal that could do it all and never sound out-of-control or unusable. The task was to create a circuit that could produce vintage fuzz style tones, explosion-esque modern-fuzz-style tones, and everything in between - all without ever getting overly noisy or misbehaving. It took some serious tinkering and an entirely new approach to fuzz circuits, but we did it. This thing will roar, scream, and sing - all at the turn of a knob, and it will never let you down by being unpredictable or unusable.

Just like all of our Field Effects pedals, the Acceleron Fuzz uses a discrete Class A topology and is built with audiophile grade components. This is the fuzz that will replace a pedal board full of other fuzz pedals.